
Introduction
Power Monitors’ Windows PMI View is a desktop app for Windows 10/11 that lets you manage your Power Monitors’ recording devices. The application seamlessly connects to PMI recorders, providing the ability to view your recorder’s status, download recordings, push firmware updates, and more.
PMI View is designed to work seamlessly with a wide range of Power Monitors’ recording devices, including:
- Bolt
- Seeker
- Tensor
- Guardian
System Requirements
To ensure optimal performance, PMI View has been designed to work with several Windows versions. The app requires Windows 10: 10.0.17763.0 or later.
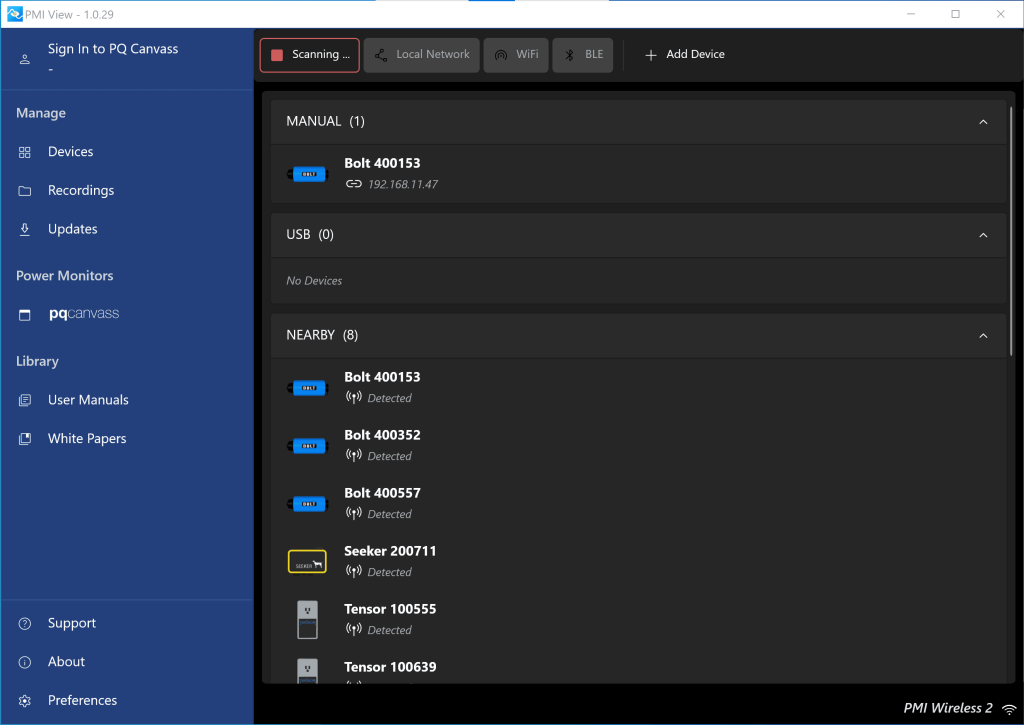
Key Features of PMI View
PMI View offers a robust set of features for configuring and retrieving data from recording devices.
Download of Recordings
Users can download recordings from their devices and upload them to PQ Canvass for analysis.
Automatic Upload of Recordings
The app will automatically upload recordings to PQ Canvass, if the user has signed in to their PQ Canvass account. Otherwise, the recordings are staged for upload to PQ Canvass at a later time, when the user is able to sign in.
Initialize Recordings
Users can initialize recordings on their devices by using one of the pre-defined initialization templates our engineers have designed, or by customizing the initialization parameters to suit your needs. Any custom changes can be saved into a new template.
Local and Remote Device Connectivity
PMI View supports various connection methods, including USB, UDP discovery, direct connection to a known IP address, scanning local Wi-Fi networks, Bluetooth low energy (BLE) discovery, and direct connection to a device’s self-hosted access point. This enables engineers and technicians to access their devices in office environments, remote locations, or challenging field installations in whichever way meets their needs the best.
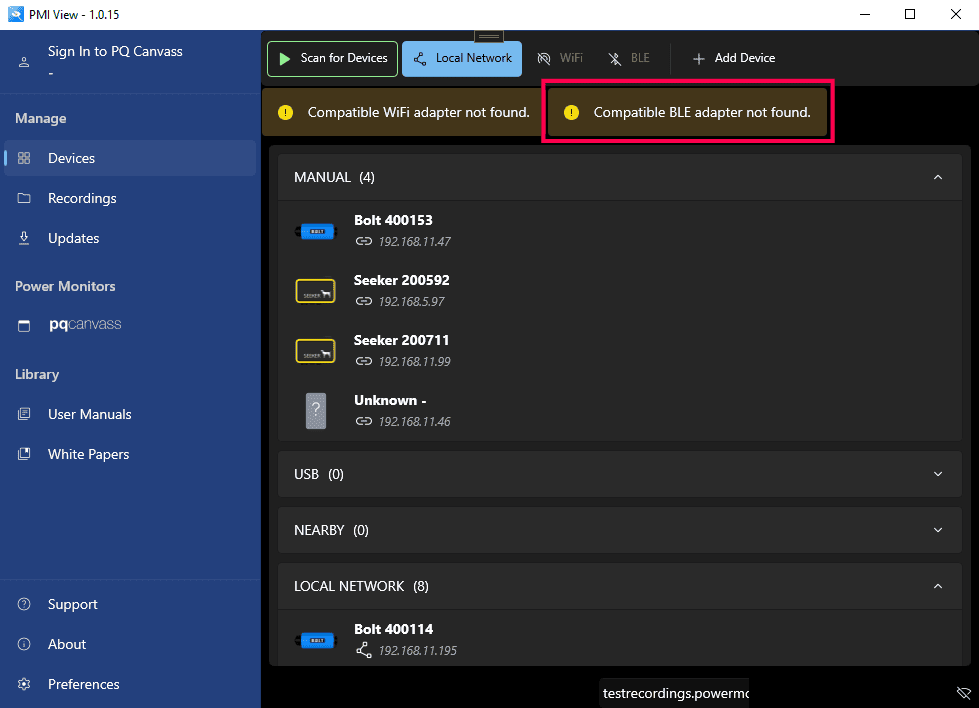
- Note: a computer that is capable of BLE extended advertising is required for some “Nearby” device discovery features. Impacted features includes BLE scanning and local Wi-Fi scanning/direct access point connections for some recorders, such as the Bolt. PMI View will indicate whether your computer has this capability or not. See Figure 2.
Manage Firmware Updates
The app will automatically pull down the latest device firmware onto your Windows machine, provided you have internet connectivity, and will display a prompt to upgrade if the downloaded version is newer than what is currently installed on the connected device.
Getting Started
Installation Process
PMI View can be obtained from the Windows Store at no cost. To download the application, open the Windows Store on your Windows device and enter “PMI View” in the search bar.
Select the application from the search results and click “Install” to install it on your device.
The PMI View interface is organized into three main sections:
- Devices:
- Scanning: Facilitates detection of nearby devices.
- Manual connection to devices whose IP is known.
- Recordings
- Displays a list of downloaded recordings that are pending upload.
- Displays recordings that were uploaded during this session.
- Updates
- Users can view which version of firmware they have downloaded from the Power Monitors’ servers for each supported recorder type. Users can also check for updates from this page.
- By default, the application will check for updates on application launch. This can be disabled in Preferences.
Connecting To Devices
USB Connection
If you connect a recorder to your computer via a USB cable, it will be automatically detected and connected to by PMI View
Nearby Scanning
PMI View utilizes two methods to detect nearby devices:
Bluetooth and Wi-Fi network scanning. Bluetooth is used to find nearby devices and activate their access points, but Wi-Fi is what ultimately does the detection, by looking at your nearby Wi-Fi networks. If Wi-Fi scanning is disabled, the Bluetooth scanning alone will not discover anything. Toggling the Wi-Fi scanning off will automatically disable the Bluetooth scanning. Devices will populate as they are detected.
- Note: This requires a minimum device firmware of 1.63 and a Bluetooth adapter that supports advanced advertising. PMI View will display a warning if your Bluetooth adapter does not support this feature.
Local Scanning
PMI View can also scan a connected network for recorders. This utilizes UDP to detect recorders on the same local network. Devices will populate as they are detected.
This is accomplished by sending out broadcast UDP packets on port 7151 and awaiting UDP responses from PMI recorders on the same network. The devices will identify themselves as PMI recorders in their response to the broadcast.
Manual
If you know a device’s serial number, you can connect manually. Simply click “Add Device”, “Enter Serial Number”, select your device type from the list, enter the serial number, and then click connect.
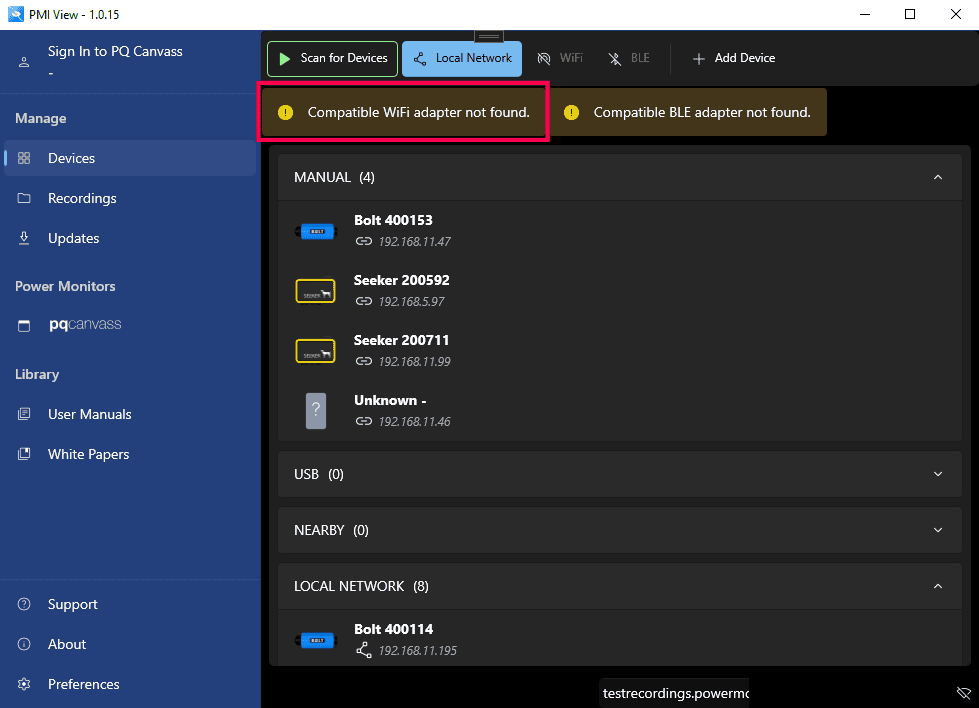
- If the device is not visible in your computer’s Wi-Fi settings, connection through the app will not be possible.
- If your computer does not support Wi-Fi, then the app will display a warning message. See Figure 3.
Alternatively, if you know the IP address of the device, direct connection is possible. Click “Add Device”, “Enter IP Address”, enter the IP address, and then click connect.
- Note: Ensure that your computer has a route to the network on which the device is connected.
Recordings
Downloading
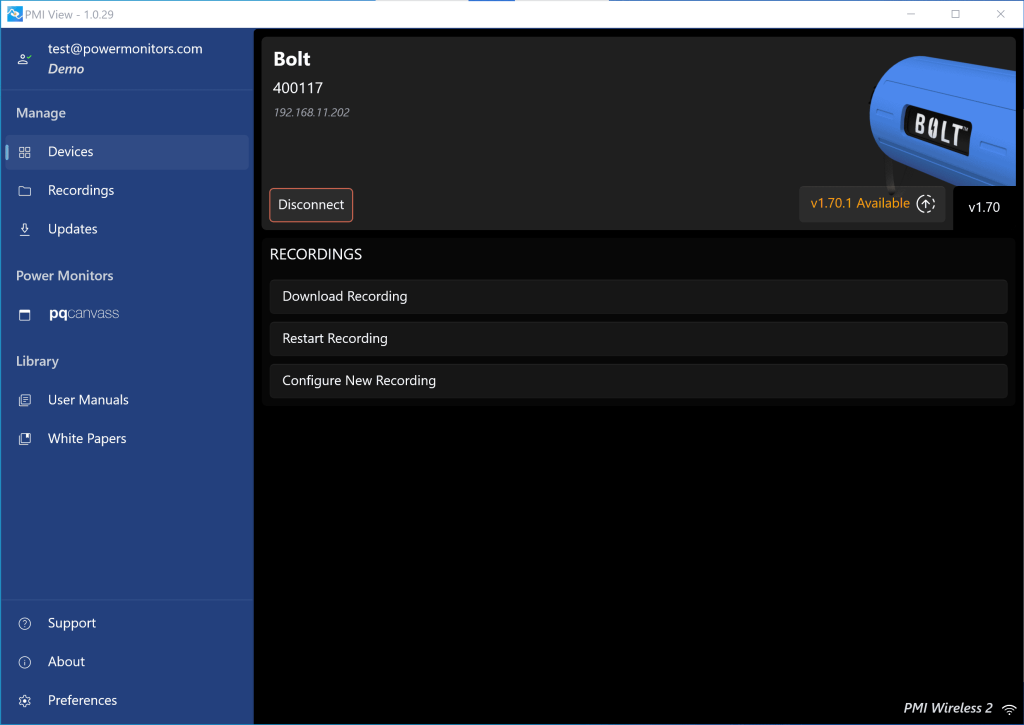
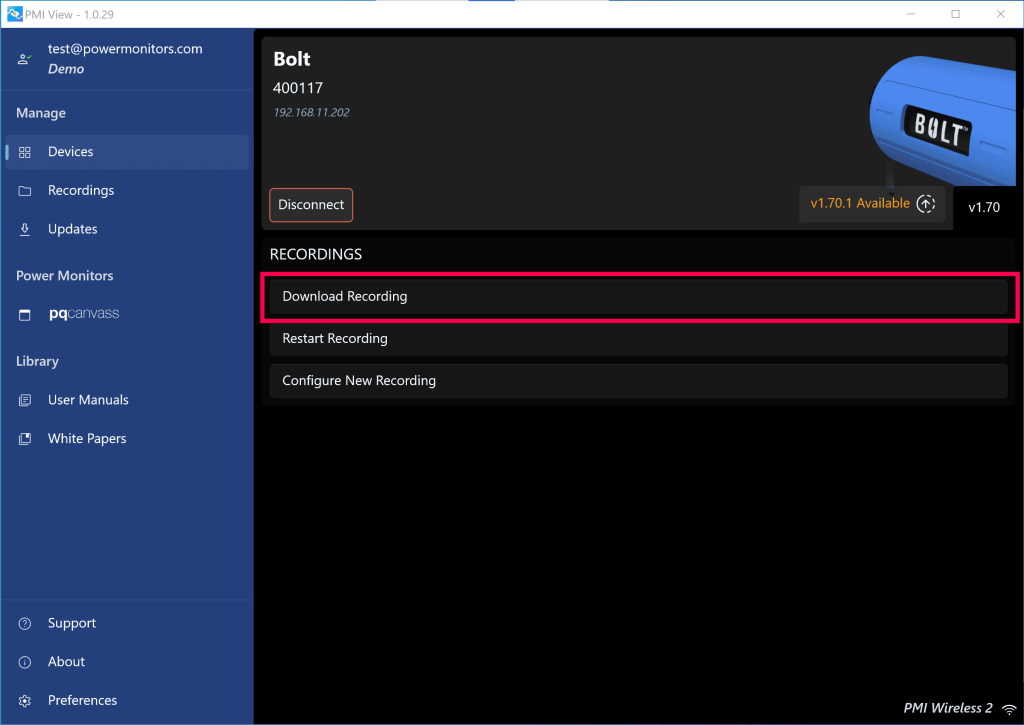
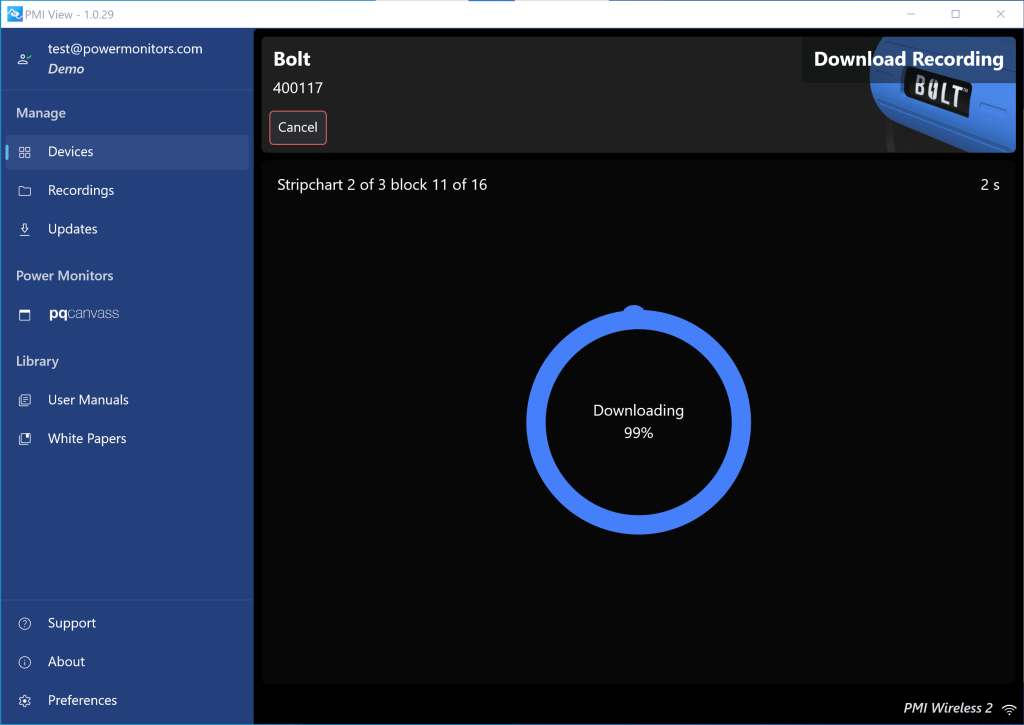
To download a recording, first connect to the device. Once connected, click the “Download Recording” button. A page will display the progress of download and will return to the previous page once completed.
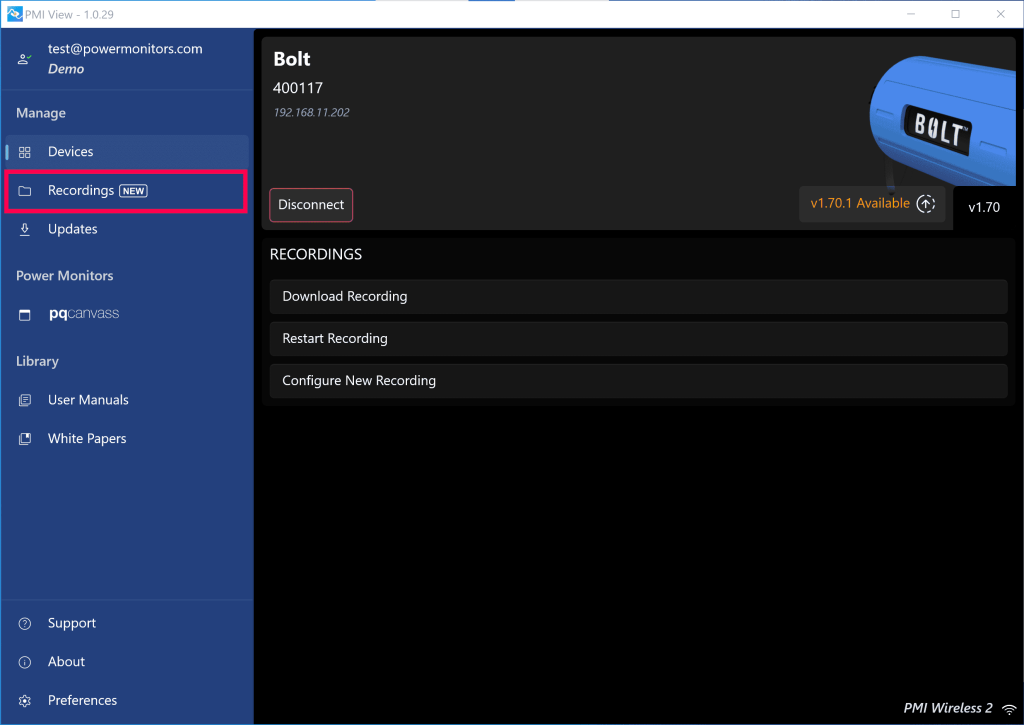
The Recordings tab will indicate that a new recording has been downloaded.
Uploading
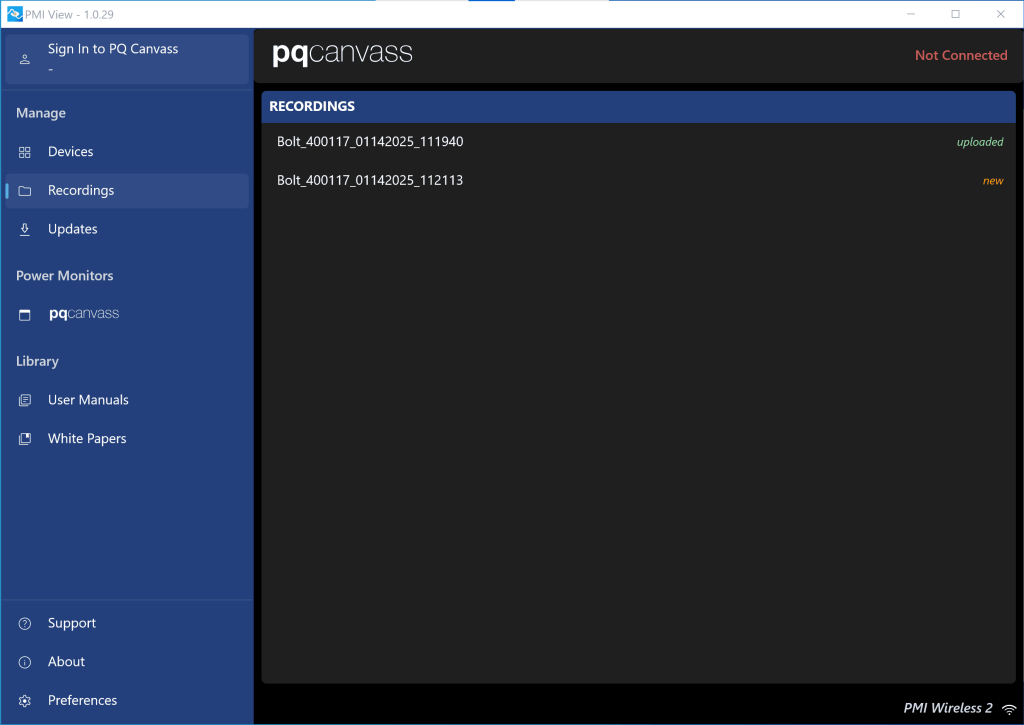
To have a recording be uploaded to PQ Canvass, you must first sign-in to your account. Here we can see a newly downloaded recording, awaiting sign-in to PQ Canvass. Once signed in, the recording is uploaded automatically.
Initializing
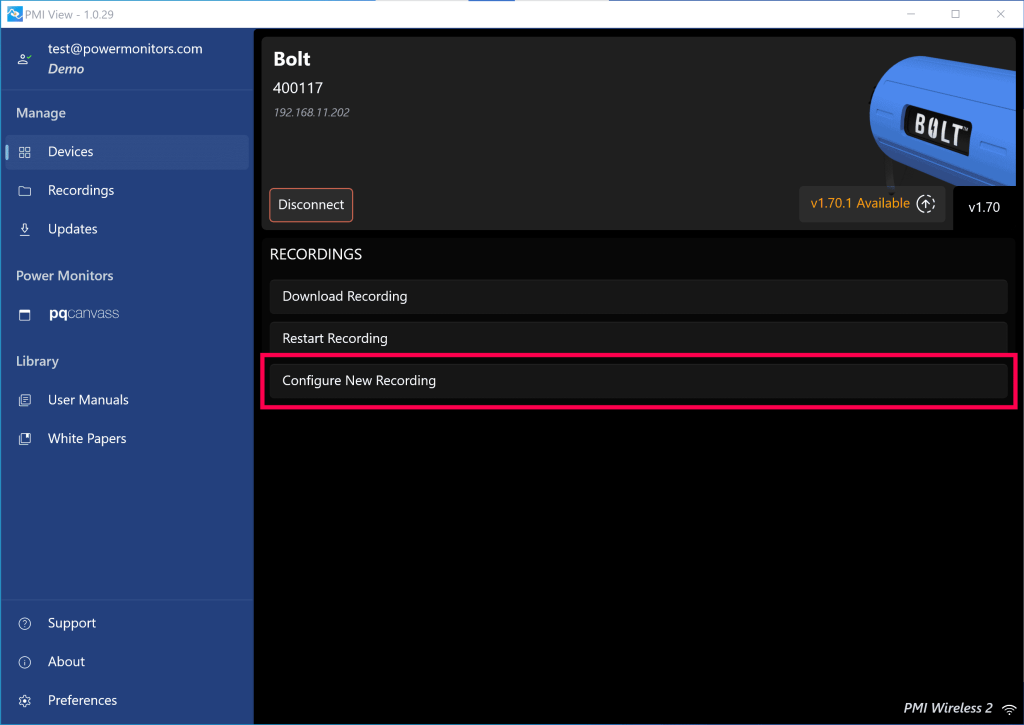
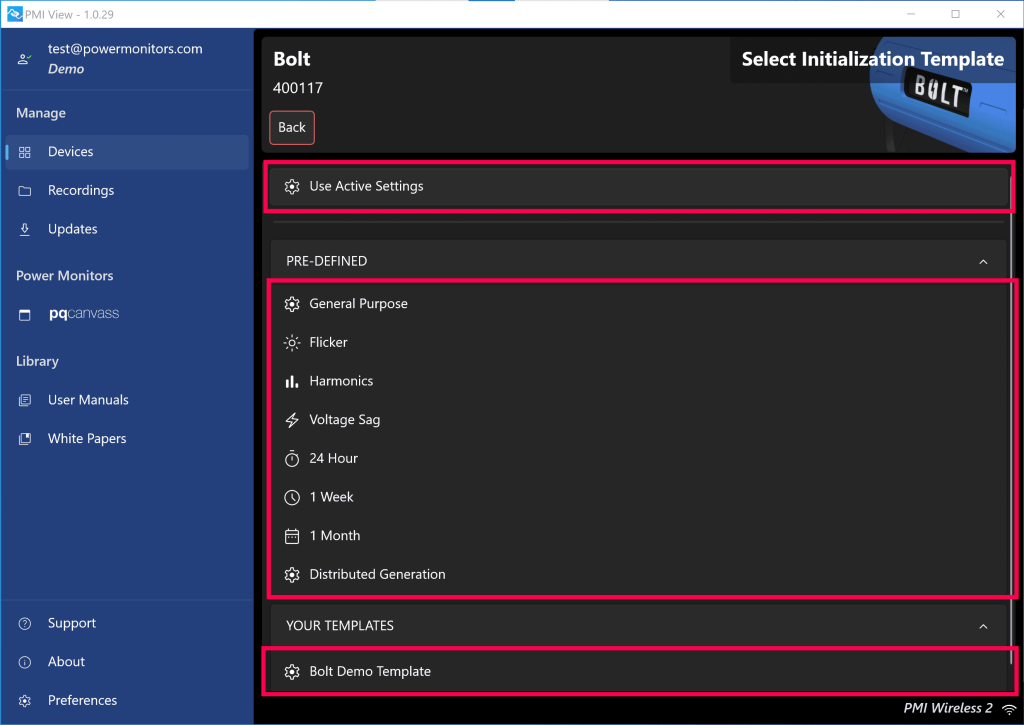
To initialize a new recording on a device, first make a connection to the device. Once connected, select the “Configure New Recording” button. This will open a new page with a list of pre-defined initialization templates, as well as any custom templates you have configured and saved. Near the top of the page, there is a “Retrieve Settings” button, which will retrieve the current recording settings from a device. This allows you to view what is currently configured, as well as make changes and initialize a new recording.
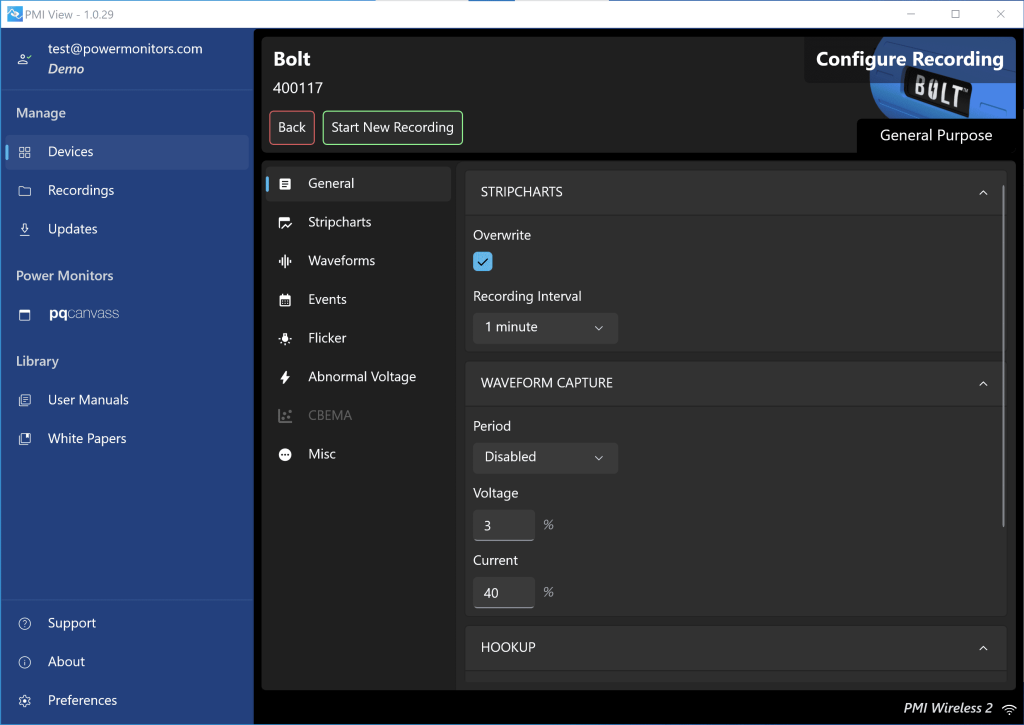
Once settings are retrieved or a template is selected, you can view and change whichever settings you desire. The settings are broken up into categories, with the most common settings under the “General” tab.
When you are satisfied with your choices, click the “Start New Recording” button. If you have made changes, a prompt is shown for saving the settings as a template before sending them to the device.
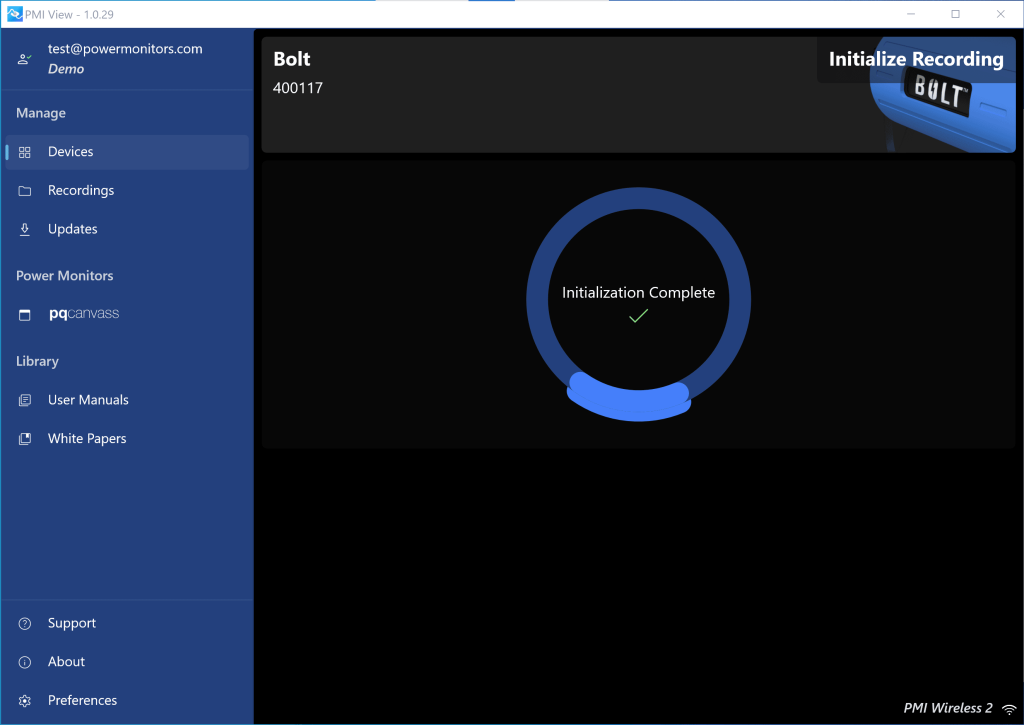
A progress page is shown while initialization settings are sent to the device, and then you are returned to the connected Device page.
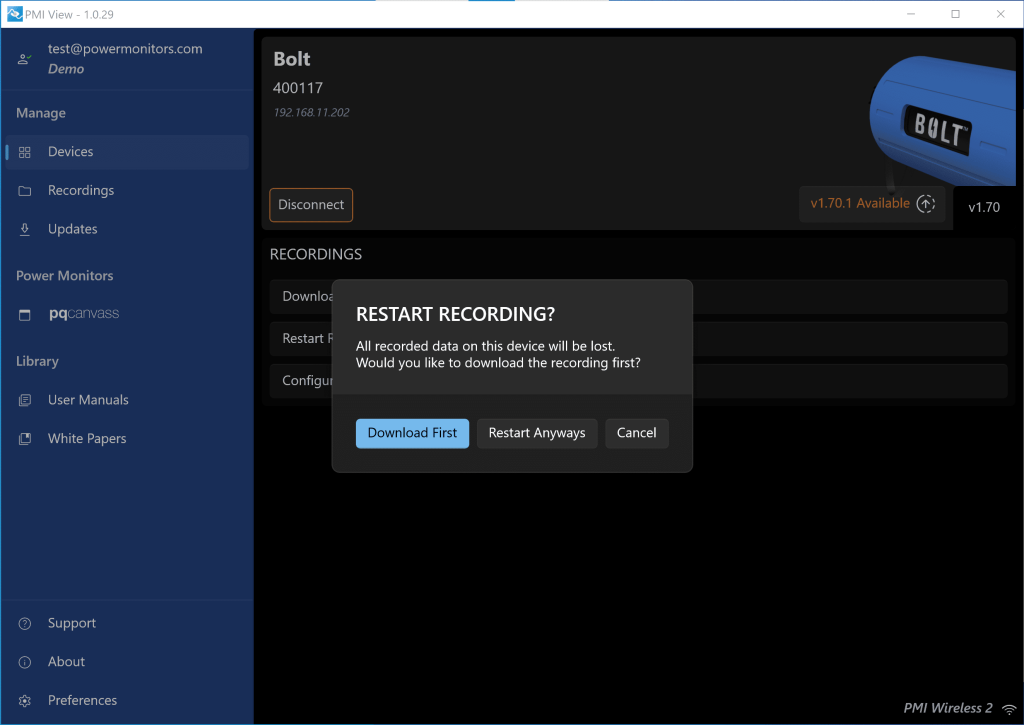
You can also simply restart a recording with the same settings by clicking the “Restart Recording” button. This will give you the option to download the recording first, and then will initialize a new recording using the same settings with which the device is currently recording.
Firmware Updates
Downloading Updates
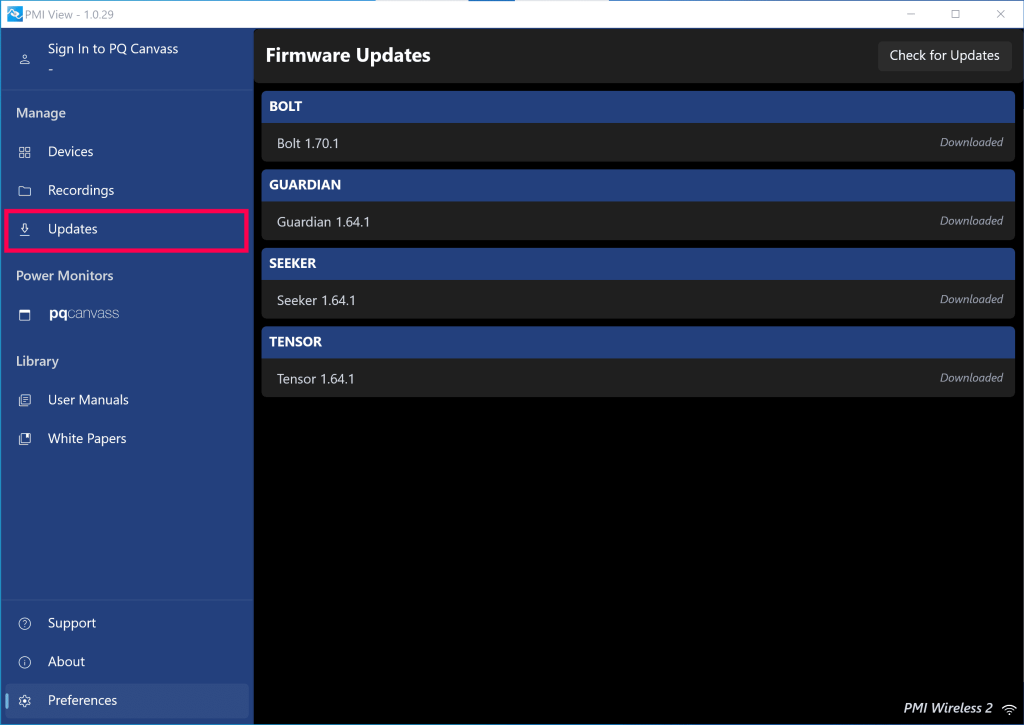
Firmware updates will download from the Power Monitor’s servers to your computer automatically (by default) on
application launch. The firmware can then be uploaded and installed to your devices whenever you wish. You can also always click the “Check for Updates” button to trigger a manual check for newer firmware.
- Note: you must be on a network with internet access for the update check to work.
The Updates page displays which version of firmware has been downloaded for each supported recorder type.
Installing Firmware Updates
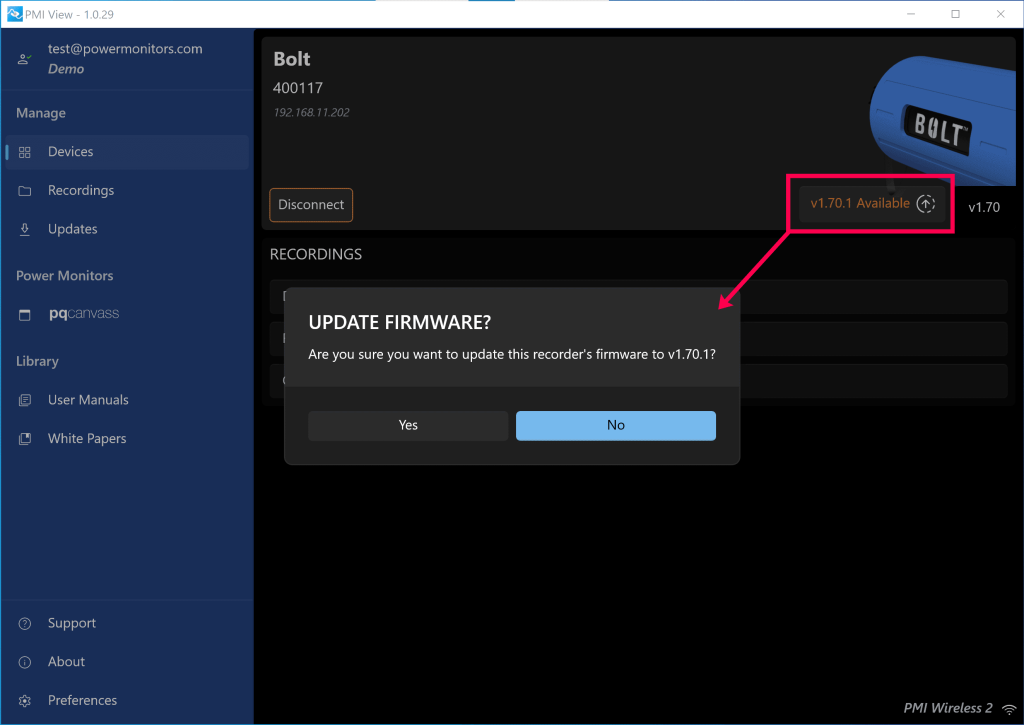
To upgrade a device’s firmware, simply connect to the device and, if there is a newer version available on your computer, click the upgrade button to start the process of uploading and installing. The upgrade button displays the version number and the word “Available”, as seen in Figure 16.
Signing in to PQ Canvass
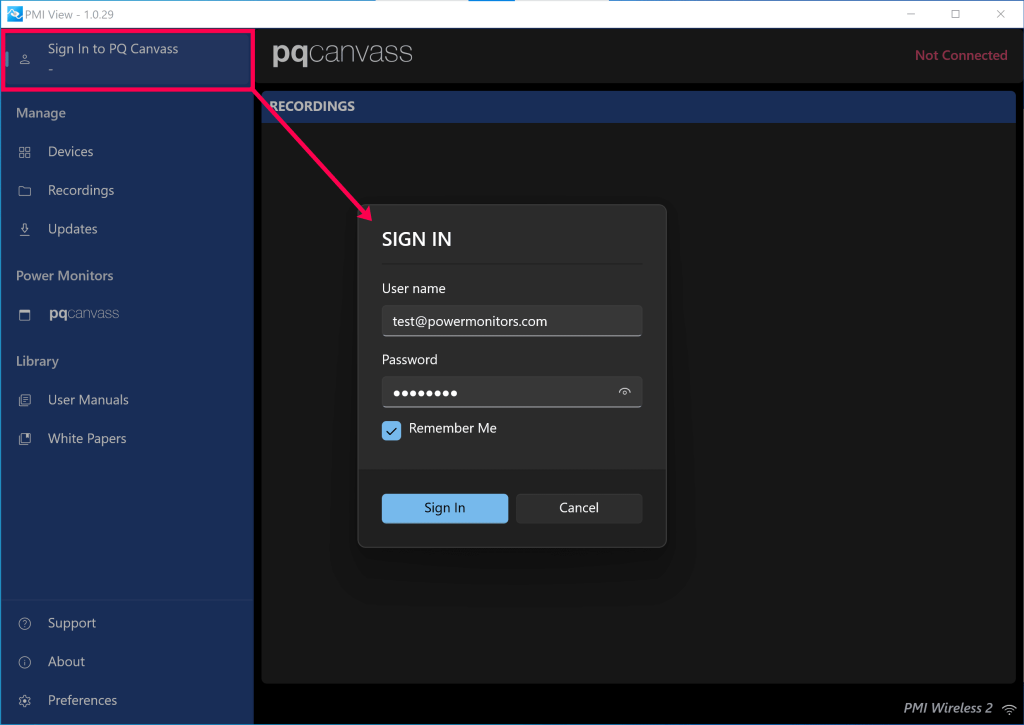
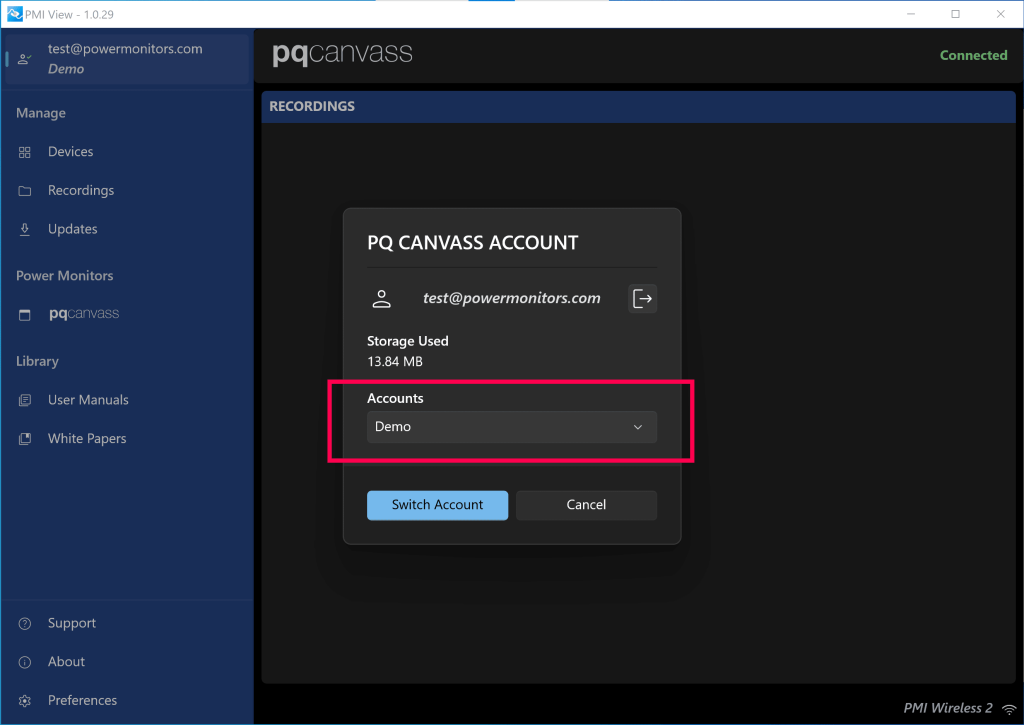
To use the auto-upload feature of PMI View, you must log into your PQ Canvass account, and then select which account you would like to upload to. (NOTE: This only applies to users who are members of multiple accounts. If you are only a member of a single account, you will not be prompted to select an account.)
Once signed in, any recordings that are queued for upload will begin to upload if an internet connection is detected. Signing out, losing internet connectivity, or connecting to another network, such as a device’s access point, will stop any upload in progress.
Configuring Preferences
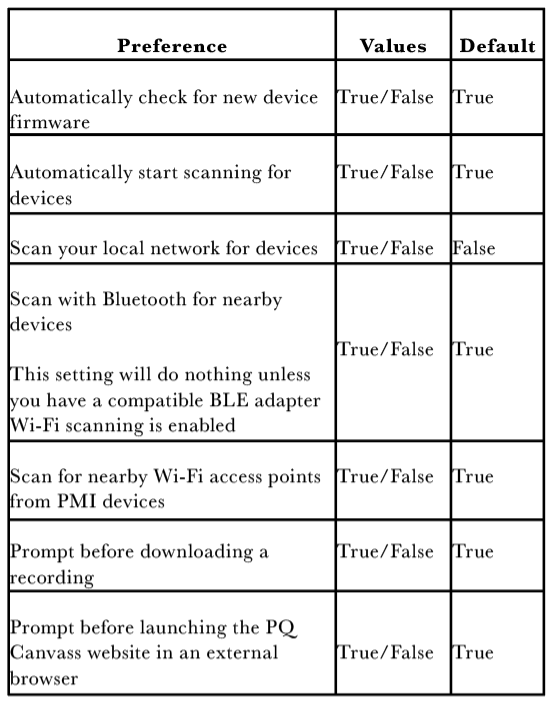
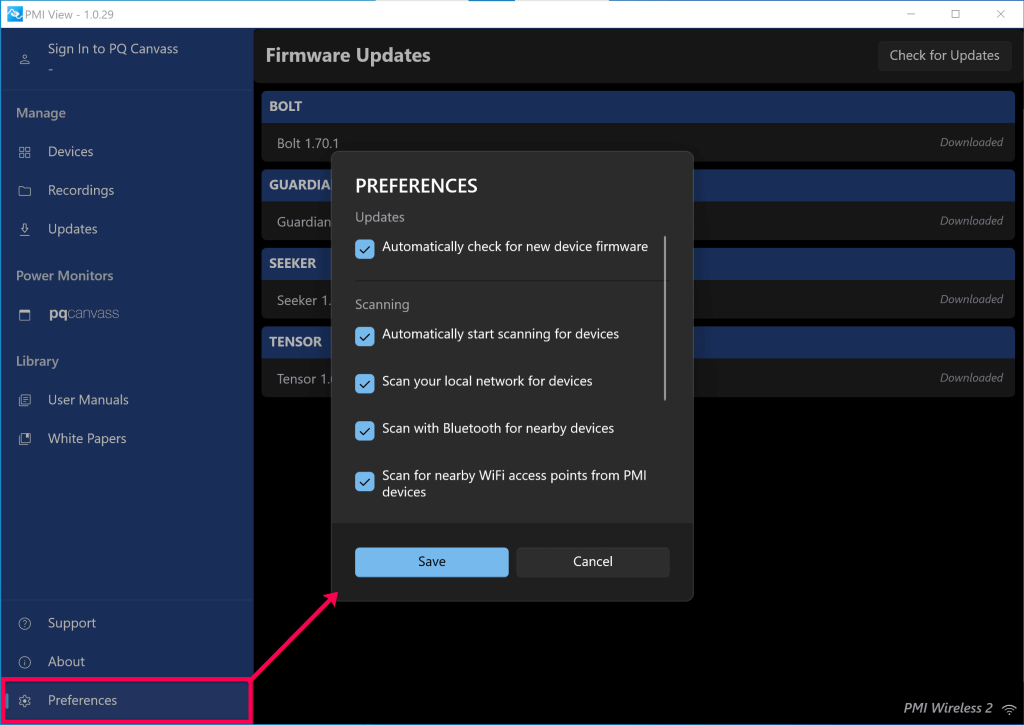
There are many preferences that users can change to tailor their experience in PMI View. Most notable are the options to enable/disable certain types of device scanning by default, or to have PMI View automatically start scanning when opened.
Conclusion
In conclusion, PMI View provides many options for discovering and connecting to devices, and seamless transfer of data into PQ Canvass. Whether you want to download data, configure a new recording, or upgrade your device to the newest firmware, PMI View makes it simple and easy.