Abstract
This white paper describes the proper communication settings for wireless PMI Recorders using ProVision software.
PMI offers many different recorders for capturing disturbing and expensive PQ events. With the many options available it is necessary to think about the needs and safety requirements of the people operating the equipment. In an effort to facilitate safer operating conditions, PMI offers wireless communication in many of its power quality analyzers. The Eagle series, Guardian, and Revolution can all be purchased with the optional Bluetooth wireless link. The Revolution can also be purchased with the long-range cellular link for optimum safety. To make best use of PMI wireless devices, it is important to know how to configure them in ProVision data analysis software.
Bluetooth Communications
Bluetooth communication is offered as an additional feature with newer PMI devices as previously mentioned. Make sure that the Bluetooth option is installed on the PMI power quality analyzer before making a Bluetooth connection. Bluetooth is a wireless data transfer protocol that is setup on a computer as a virtual COM port. It is necessary to have a computer with internal Bluetooth or purchase an external USB Bluetooth adapter before this connection will function. Follow the steps below to initiate a Bluetooth connection with ProVision software.
Internal/External Bluetooth
NOTE: These instructions are generic and may differ from computer to computer; please check with the computer manufacture for more specific instructions.
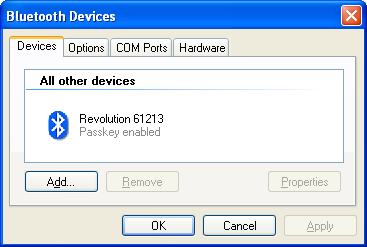
Turn on the computer’s Bluetooth adapter and create a new connection by going to the Control Panel and Click Bluetooth Devices. The Bluetooth devices dialog box will appear as shown in Figure 1.
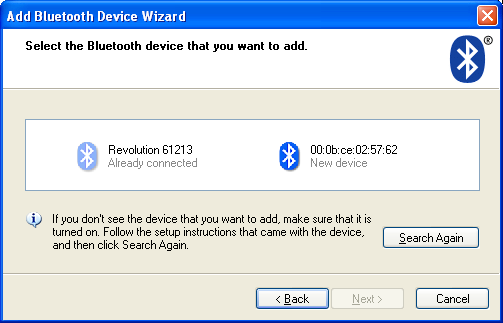
Add New Device. Click Add and wait for the Add Bluetooth Device Wizard to appear. Check My Device is set up and ready to be found and Click Next at the bottom of the dialog box. The Device wizard will search for any available Bluetooth devices as shown in Figure 2. Select the device to be added by highlighting and clicking Next.
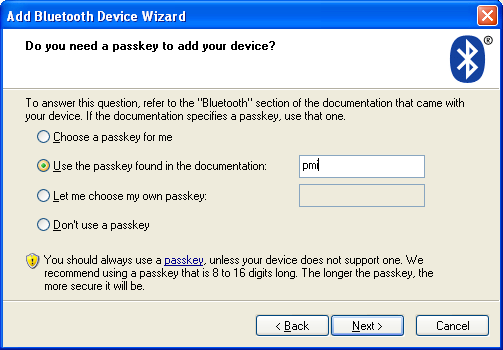
Passkey. The passkey is a security feature used by most Bluetooth devices. The passkey for PMI products is lower-case pmi. To enable the passkey Check Use the passkey found in documentation: and type lower-case ‘pmi’ as shown in Figure 3. Click Next to proceed to the passkey exchange.
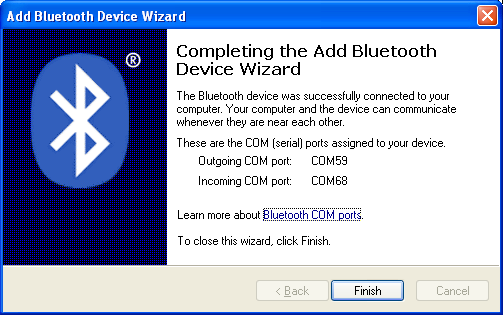
Passkey Exchange. The Add New Bluetooth Device Wizard will try and exchange the passkey security information to the PMI Recorder and connect. Once the connection is made the Wizard will complete the exchange and assign a Virtual COM port to the PMI Recorder as shown in Figure 4. There will be two COM ports assigned, Outgoing and Incoming, the Outgoing port information is needed to create the connection with the ProVision software.
ProVision Setup. In order to use the Bluetooth Recorder with the ProVision Software, communication settings in ProVision need to be created. Below are the steps needed to create the Bluetooth connection with ProVision software.
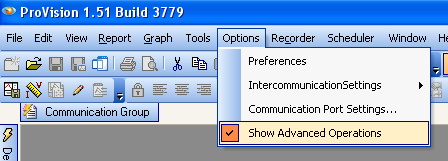
Advanced Operations. Under Options make sure Show Advanced Operations is checked as shown in Figure 5.
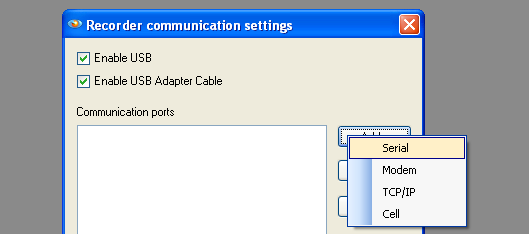
Recorder Communication Settings. Under Options Click Communications Port Settings and the Dialog box will appear as shown in Figure 6.

Add Connection. Click Add and then Select Serial as shown in Figure 7.
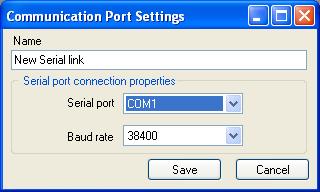
Connection Properties. After the serial link is added the Connection Properties Dialog box will appear as shown in Figure 8.
Name. In the name window create a custom name for the Bluetooth Link to the recorder. Hints: Choose a name for the specific recorder being used and add the serial number to identify the exact unit. Example: BT Eagle Connection – Serial 31035 as shown in Figure 9.
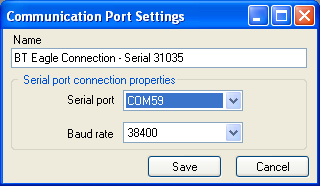
Serial Port. Choose the serial port that will be used on the computer. Note: This is the outgoing port information given by the Windows Bluetooth driver in the previous step. Select the COM port that was assigned. EXAMPLE: Outgoing port from the previous windows driver setup (Figure 4.) was COM 59 as shown in Figure 9.
Baud Rate. The baud rate is the speed at which the serial port transfers data to and from the connected device. This setting has no interaction with the windows Bluetooth driver and is not required.
Save. After all parameters are set in the connection properties dialog Click Save.
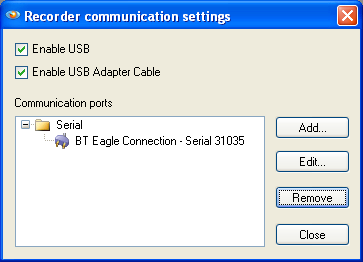
Communication Ports. After successfully creating a new Bluetooth connection the Port will appear as shown in Figure 10.
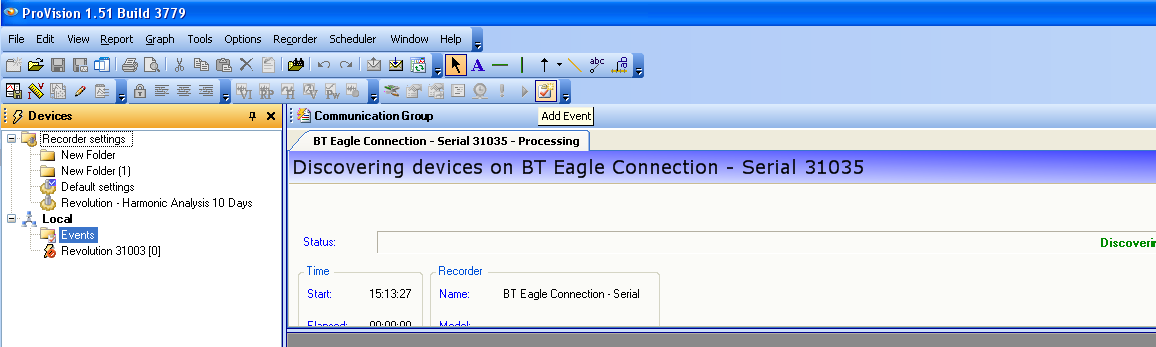
Connecting to a Recorder. After powering the Bluetooth Recorder via AC Voltage on CH1, Click Recorder Connect and select the New Bluetooth connection. ProVision will scan for the connected Recorder on COM59 and connect as shown in Figure 11. After the connection is complete it will be possible to interact with the Recorder wirelessly.
Cell Communication
Cellular communications are offered as an additional feature with the Revolution line as previously mentioned. Make sure the cellular option is installed on the device before making a wireless connection. Cellular communication uses a TCP link to the host computer to send data wirelessly anywhere that has Verizon Cell service. It is necessary to register the device with Verizon and have active service before this connection will function. Follow the steps below to initiate a cellular connection within ProVision. There are two types of communication service that can be provided to the modem and use either Dynamic or Static IP address. The ProVision connection is the same for both types.
Provisioning Modem. In order to use the cell modem in the Revolution product, first contact Power Monitors to have the modem provisioned. Provisioning the modem will register the device on the Verizon Network and will also allow PMI to register the device in its cell database. PMI’s cell database is used to assign an IP address to the modem in the Revolution device. The IP address is needed to create the connection with ProVision. To simplify the process, and because the user doesn’t need this information, the device IP address is automatically configured within the PMI database.
ProVision Setup. In order to use the Cell Revolution with the ProVision, communication settings in ProVision need to be created. Below are the steps needed to create the Cellular connection with ProVision.
Advanced Operations. Under Options make sure the Show Advanced Operations is checked as shown in Figure 12.
Recorder Communication Settings. Under Options Click Communications Port Settings and the Dialog box will appear as shown in Figure 13.
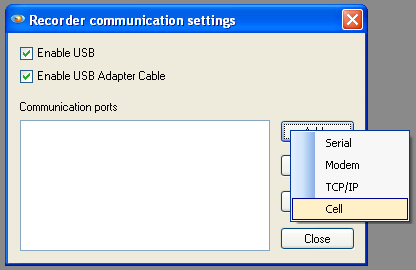
Add Connection. Click Add and then Select Cell as shown in Figure 14.

Connection Properties. After the Cell Link is added the Connection Properties Dialog box will appear as shown in Figure 15.
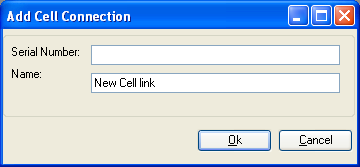
Serial Number. Choose the serial number of the Revolution recorder that is being used.
NOTE: This is shown on the shipping box and the label on the top of the Revolution. Example: 14012 as shown in Figure 16. This serial number is used to connect to the PMI database to allow ProVision to obtain the IP address of the Cell Modem.
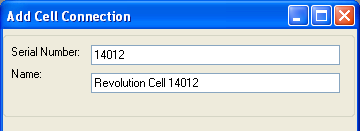
Name. In the name window create a custom name for the cell Revolution connection. TIP: Choose a name for the specific recorder being used and add the serial number to identify the exact unit. Example: Revolution Cell 14012 as shown in Figure 16.
Save. After all parameters are set in the connection properties dialog Click OK.
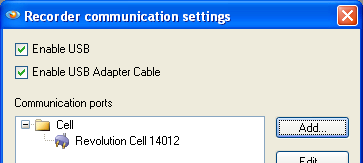
Communication Ports. After successfully creating a new Cell connection the Port will appear as shown in Figure 17.
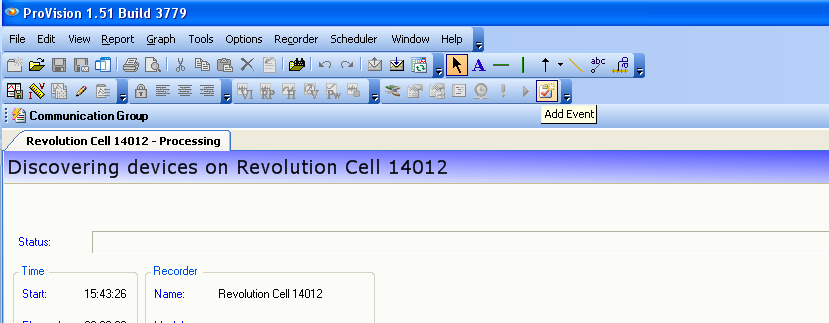
Connecting to a Recorder. After powering the Revolution recorder via AC Voltage on CH1, Click Recorder >Connect and select the New Cell connection. ProVision will scan for the connected Recorder and connect as shown in Figure 18. After the connection it will be possible to interact with the recorder wirelessly.
Conclusion
PMI offers the ability to stay safe while troubleshooting dangerous PQ issues. With a little background knowledge in the communications settings used to connect your recorder, you will spend more time in the field and less in the office. The time spent reviewing the software interface and connection properties will be well worth the time and effort.
