Abstract
The Recording Inspector is a new ProVision feature for finding lost files, classifying files by category or recorded data, and combing through large file sets for a certain data type. Currently, the best way in ProVision to examine shared information from multiple files—such as start time, stop time, recording length, and so forth—is to open each header report and compare them individually. However, with the introduction of the new Recording Inspector, shared information from multiple files can be quickly gathered for comparison. This features is available starting in ProVision 1.61, build 4868. This white paper serves as an overview and demonstration of the Recording Inspector tool.
The Recording Inspector can be opened by selecting Tools from the main menu, then choosing Recording Inspector. Doing so launches the Recording Inspector window as shown in Figure 1. This window is populated into several distinct regions. On the left is a collection of watcher folders containing recording files that can be inspected. On the right is a workspace where the desired fields to be extracted from the recordings can be added or removed. The Report Inspector functions by consecutively opening each selected file, extracting the requested summary data from it, then presenting these data as a report in ProVision.
Selecting Recordings
The left pane, or source pane, is a collection of all available recordings, sourced from watcher folders. Depending on the length of filename and the number of recordings, scrollbars may be present at the bottom and side of the source pane. To view more files, the scrollbars can be moved or the entire Recording Inspector window can be resized or maximized. Any number of recordings can be selected for inspection. Any individual recording can be selected or excluded by checking or clearing the checkbox, respectively, next to the name of the recording.
There are also two context menus available: the first is produced when right-clicking with the mouse anywhere in the source pane. The options in this context menu allow for all available recordings to be selected or excluded. At the bottom, there are also options that affect the state of the tree, allowing all folders to be set to the expanded or collapsed state.
Also available is a “Select by Name” entry. This option allows automatic selection of any file with a name that matches a specified pattern. Note that this option will automatically select any file that contains the string at some point. Therefore, specifying a pattern of “s3” will select “s3recording.xsb” and “recording_s3.xsb”, but not “s_recording_3.xsb”. Performing this operation only causes recordings that match the pattern to be selected—it will not exclude any previously selected recording that does not match the pattern.
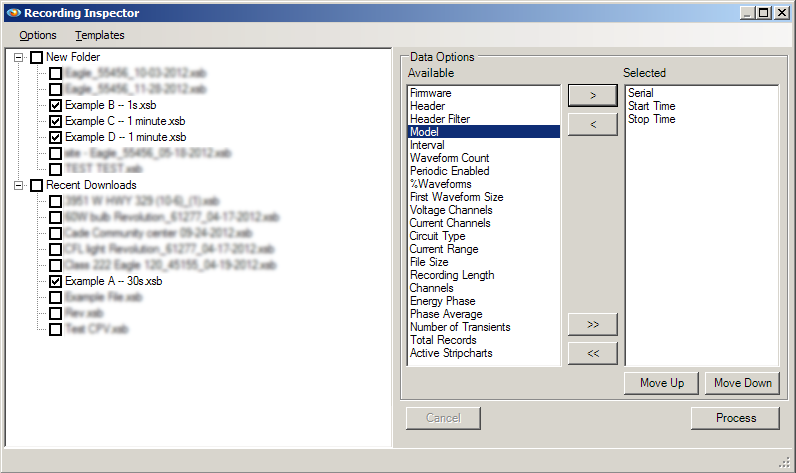
Right-clicking any of the folders with the mouse produces a different context menu with other selection options. These options allow selecting or excluding all the recordings in the folder. Note that the other two options allow this to be done recursively—that is, for any folder contained therein, the recordings in that folder will also be selected or excluded, and so forth.
Building the Data Set
The right pane, or the data options pane, consists of two primary regions: the available options, and the selected options. The available region contains fields whose data will not be included in the final report, while the fields in the selected region will be displayed. The fields available for selection include summary information about the recording itself, and not the power quality data within: examples of some of the fields that can be included are recording length, file size, firmware version, recorder serial number, and circuit type.
Some fields, when added, will prompt for additional information when moved to selected. These fields are treated as filters, such that any recording that, when being inspected, does not match the filter condition will be excluded from the final report. These fields have the word “Filter” in their name, and when in the selected region, the specified filter is displayed.
For example, when adding “Header Filter”, a specific filter string must be supplied. When a recording is inspected, it will only be included in the final report if and only if at least one of the header report lines contains the filter string. If the filter string is not found in the recording’s header report, that recording is excluded. This can be convenient when seeking specific recordings when the header report contains more information about the recording than the filename does.
The four buttons between these two regions allow fields to be moved freely between available and selected. From top to bottom, they perform: movement of the single currently-selected field from available fields to selected fields, movement of the currently-selected field from selected fields back to available, movement of all fields from available to selected, and movement of all fields from selected to available. Fields added to selected are always placed at the bottom of the list, while fields moved back to available are placed back in their initial location in that list.
Once the desired list of fields have been added to the selected region, these fields can be reordered by using the Move Up and Move Down buttons. This allows customization of the list such that the final report will contain these fields in this order.
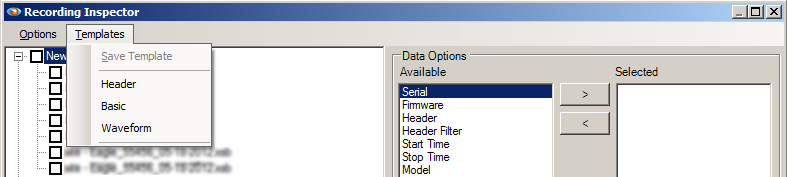
Templates
Once a list of selected fields has been finalized in the selected region, the selected fields and the order they are in can be saved as a template. Once saved, the template can be recalled for future uses. To save a template, select Templates from the menu bar, then choose the Save Template option. New templates are added as an entry to the Templates menu. Applying a template can be done by opening the Template menu and selecting the desired template. The fields in the template will be automatically added to the selected region, and prompts for filters, if included, will be made. Several prefabricated templates are available in the menu as a default.
Creating the Report
Once the desired files have been selected in the source pane, and the data fields have been chosen and organized in the data options pane, the report can be generated. Clicking the Process button begins the operation. Note that the length of time this operation takes to complete can be considerable, and is based on the number of recordings selected, the file size of the selected recordings, the fields selected, and for each field the complexity of the data to be extracted. Other parameters, such as latency for recordings stored at network locations and the performance of the computer processing the operation, can also affect the runtime.
While the Recording Inspector is running, the inspector UI disables itself and other interactions with ProVision are prevented. The status bar relays the current progress out of all the files, as well as the file currently being processed. At any point during the operation, however, the Recording Inspector can be interrupted with the Cancel button. Note that cancelling the operation will cause any data prepared to be discarded. Attempting to close the form will also result in a prompt for whether the operation should be cancelled.
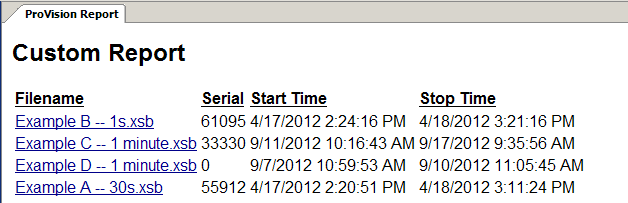
Once the operation is complete, the Recording Inspector will display any files that were unable to be processed, if any. Afterward, the Recording Inspector will close automatically and the data extracted from the recordings will be displayed in the form of a ProVision report as shown in Figure 3. This report functions identically to any other report type in ProVision and can be exported to other formats, such as CSV, for inspection in third-party programs.
Note the first data column is filename, followed by the sequence specified by the selected fields. This first column is implicit and will always be present, and will be the only one if no fields have been selected. Furthermore, the hyperlinks consisting of these will, in ProVision, automatically launch the header report associated with that recording. Note that some selected fields do generate multiple columns of data in the final report.
Conclusion
The Recording Inspector can simplify time-consuming tasks, classify multiple files, and extract summary or overview data for viewing either in ProVision or in third-party applications. This white paper serves as an overview of this feature, and how the Recording Inspector can extract data from hundreds of different files stored in multiple locations.
