Abstract
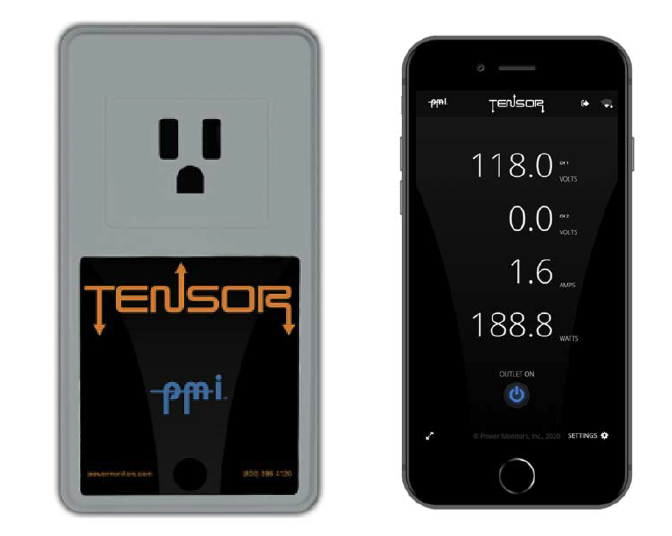
The Tensor is an innovative PQ analysis tool introduced by Power Monitors. Inc. Equipped with cellular and WiFi communication options, the Tensor allows for continuous measurements wirelessly streamed for analysis or compliance, allowing for real-time and historical data to be accessed remotely through PMI’s web-based PQ portal: PQ Canvass. Controlled environments can now be seamlessly monitored for temperature, humidity, pressure, and electric power quality With SMS and email alerts, the Tensor ensures rapid communication of any environmental or power quality issues.
Measurements
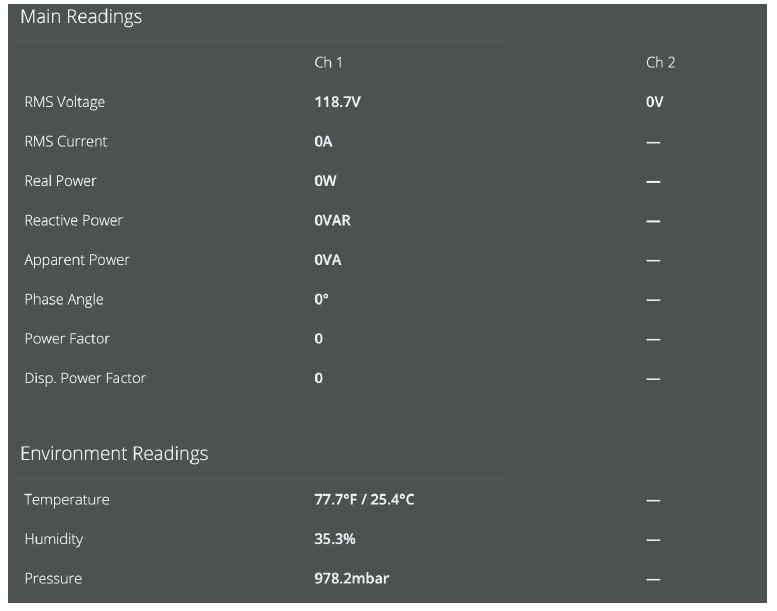
The Tensor extends its monitoring capabilities beyond typical power quality devices by adding environmental
measurements. It records temperatures from 5°C (41°F) to 60°C (140°F) , pressures between 500 to 1100 hPa (hectopascal), and humidity levels spanning from 10 to 95% RH (Relative Humidity). This versatility allows users to garner a comprehensive overview of any environment proximate to the Tensor.
In addition to environmental insights, the Tensor offers detailed power quality metrics. Basic measurements
encompass RMS Voltage (Volts), RMS Current (Amps), Real Power (Watts), Apparent Power (VAs), Reactive Power (VARs), and Power Usage (kWh, kVARh, kVAh). Moreover, advanced metrics include waveform capture, harmonics, IEEE flicker, and CBEMA/ITIC event capture.
Tensor Connection – WiFi & Cellular
The Tensor offers two primary wireless connectivity options: Cell and WiFi. These options are designed to ensure that users can access data in real-time, without the requirement to physically access the device for data retrieval. By enabling data viewing from any location at any time, users can swiftly identify and address potential issues.
- Cell Connectivity. In situations where a WiFi network is unavailable or the Tensor is placed in remote areas, the Cell Tensor is a viable option. It utilizes cellular connectivity, similar to mobile phones. Essentially, wherever there’s a cellular signal, the Cell Tensor can transmit its data, ensuring consistent monitoring even in challenging or remote environments.
- WiFi Connectivity. All non-Cellular Tensors can be equipped with WiFi capabilities. This allows the device to connect to existing wireless networks, typically found in homes or offices. By connecting to these networks, the Tensor can transmit its data for real-time viewing and analysis.
Initiation of WiFi Settings on an IOS Device
On your iOS device, navigate to the ‘Settings’ app. Once inside, tap on ‘Wi-Fi’ to view available networks. In the list of available networks, look for the one labeled “Tensor Serial Number”, where Serial Number corresponds to the unique identifier for your specific Tensor (This serial number can be found on the label on the back of the unit).
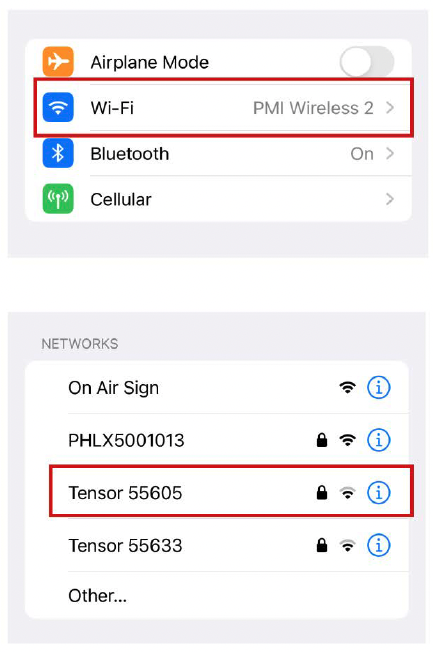
Connecting to the Tensor
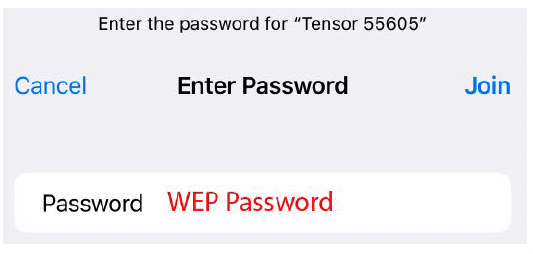
Once you’ve identified the correct Tensor network, tap on it to initiate a connection. When prompted for a password, enter the WEP key that was delivered with the Tensor.
After successfully connecting, a captive portal will automatically pop up on your device. This portal is the interface through which you’ll interact with the Tensor.
Note: If the captive portal does not automatically appear after a couple of seconds, you can access it manually by opening a browser and connecting to: 172.16.33.1.
Verify Certificate
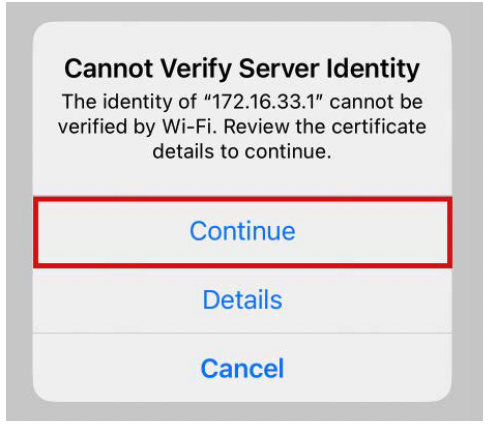
A pop-up may appear stating “Cannot Verify Server Identity”. If this pop-up appears, it means that you must verify the server identity to continue. To do this, simply tap on ‘continue’ from the pop-up. (this warning appears because each Tensor has a unique self-signed certificate.
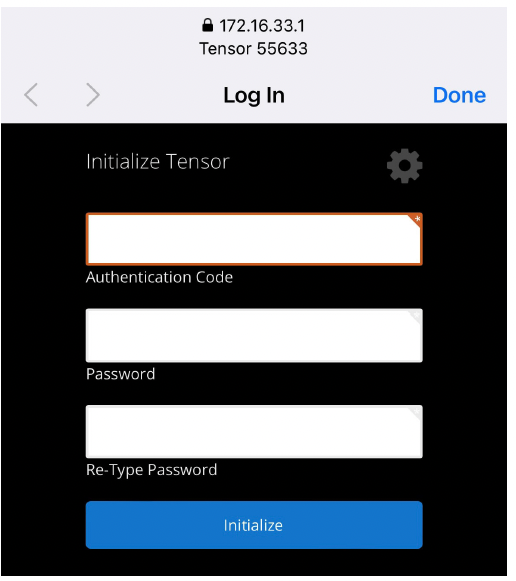
Initial Login
For first-time access, you will be prompted to set an admin password. The Tensor ships with an identification card that includes the serial number, MAC address and an authentication code. The authentication code allows you to set your own password upon first login, as the Tensor does not ship with a default password.
Ensure you choose a strong and memorable password. Your new login will be:
• Username: admin
• Password:
Note: If you have trouble with authentication, contact the PMI Technical Support Team.
Identify Connection Status
If the Tensor isn’t connected to a Wi-Fi network, you’ll see a blue banner on the ‘Live’ data page. Click on [Connect] or alternatively, go to [Settings] at the page’s bottom and choose [WiFi Network]. From the list of available networks, choose the one you wish to connect the Tensor to. If the selected network is secured, you’ll be prompted to input its wireless password.
Reconfiguring and Reconnecting
Upon entering the password, the Tensor will adjust its settings, possibly causing the captive portal to close.
If your device doesn’t automatically reconnect to “Tensor <serial number>”, manually select that network again to establish the connection.
At this point, the Tensor should be connected to your chosen network, allowing it to transmit its data seamlessly to the PQ Canvass website.
Tensor Configuration Procedures
Upon completing the authentication process, users will transition into the Tensor’s captive portal dashboard. This interface is a dual-faceted platform: it serves as an avenue for real-time readings and facilitates device configuration functionalities.
Device Configuration Access
Interface Navigation
Transition to the configuration segment by selecting the gear-shaped icon, denoted as ‘Settings’, situated in the lower right quadrant of the dashboard.
Configuration Options
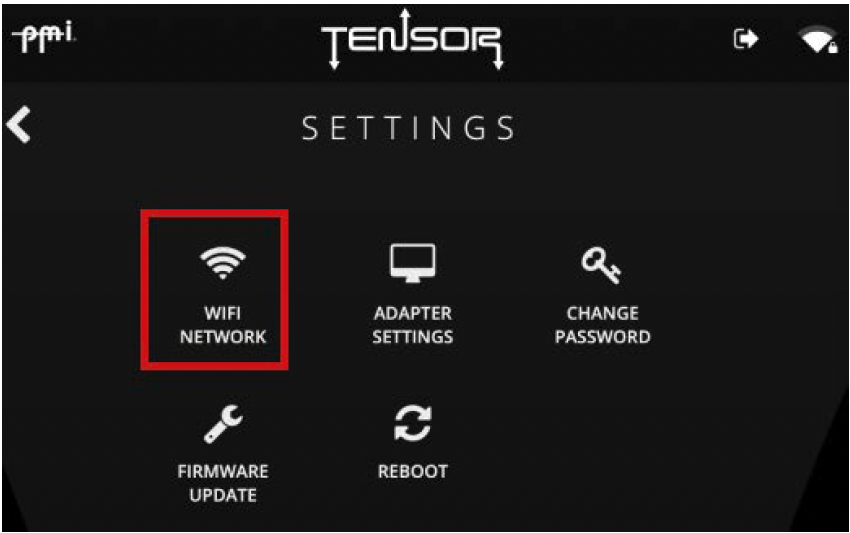
Within this segment, users are granted the ability to execute a range of functions including:
• Initiating Wi-Fi network configurations
• Adjusting adapter specifications
• Modifying the administrative credentials
• Undertaking a complete device reboot
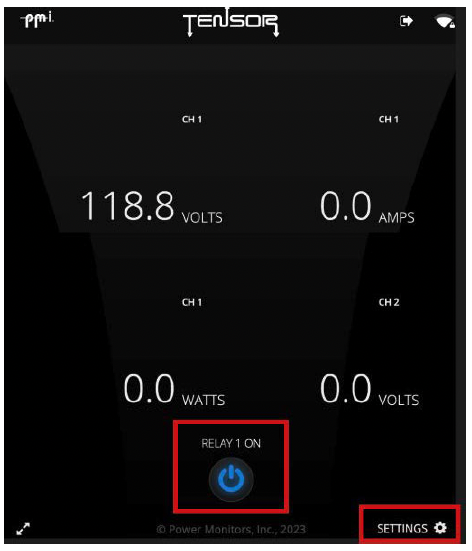
The central power interface, symbolized by the power icon, governs the activation of the plug located on the front of the Tensor. The text situated above this icon provides insight into the relay’s current operational state.
Wi-Fi Network Protocols
These protocols outline the systematic procedures for establishing, modifying, and managing the Tensor’s connectivity to wireless networks.
Network Affliation Modification
To reconfigure the Tensor’s network association, navigate via: Settings > Wi-Fi Network. To connect, activate the ‘Connect’ option found to the right of the desired network name. From there, input the Wi-FI password to connect to the network. Similarly, you can tap ‘Disconnect’ to disconnect from the network.
If you are not finding the desired network, simply tap the “reload” icon in the lower left-hand corner of the screen. To connect to an SSID manually, select the ‘Other Network’ option found in the bottom right-hand corner. After inputting the SSID, the Tensor will manually connect to the network

Using PQ Canvass on Your IOS Device
PQ Canvass offers seamless integration with your Tensor on iOS platforms, providing real-time data visualization, device management, and immediate access to recorded metrics. Whether you’re working from an office computer or remotely via a smartphone or tablet, PQ Canvass ensures consistent dataaccessibility with mobile devices.
On your iOS device, open Safari or your chosen web browser, navigate to pqcanvass.powermonitors.com, and enter your login credentials to access and use the PQ Canvass platform. If you have trouble logging into PQ Canvass, contact the PMI Technical Support Team.
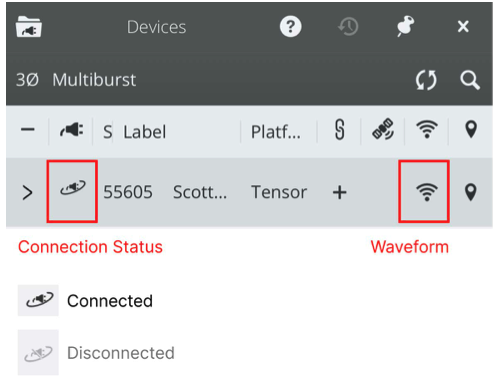
Verify Connection
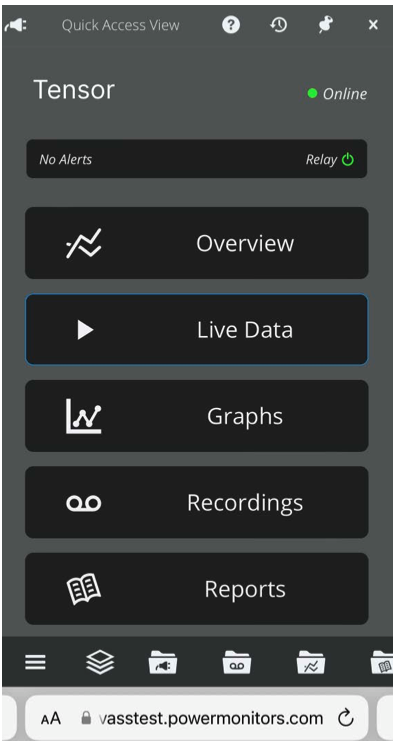
Within PQ Canvass, a connection status icon is found to the left of the Tensor’s serial number. This icon is a visual assurance that the unit is actively online and transmitting data. You can also navigate to the Quick Access view by tapping the Tensor from the device list. Next to the Tensor’s name will be an indicator showing the device’s connection status. You can also toggle the relay by tapping the relay icon.
For a comprehensive exploration of PQ Canvass’s advanced power monitoring capabilities, refer to the white paper “PQ CANVASS – GETTING STARTED.” or the Tensor’s manual.
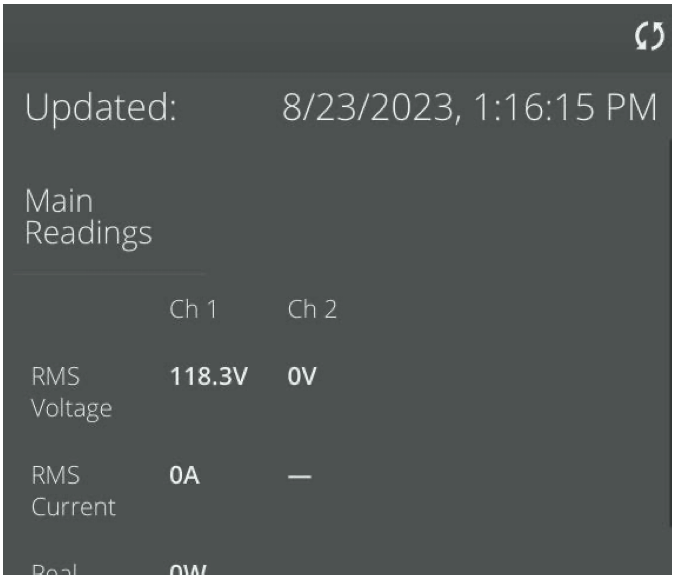
Live Readings
To see the Tensor’s real-time measurements, navigate to Live Data > Meter > Live Meter, where you’ll find both current power metrics and environmental readings. This immediate access to live data on a mobile device empowers users with proactive management capabilities on the go, maximizing the benefits of portable monitoring.
Live Waveforms
PQ Canvass provides live waveform visualization from your Tensor. This real-time data flow allows users to ensure that the Tensor is operational and that any load that is plugged into the Tensor is operating as desired.
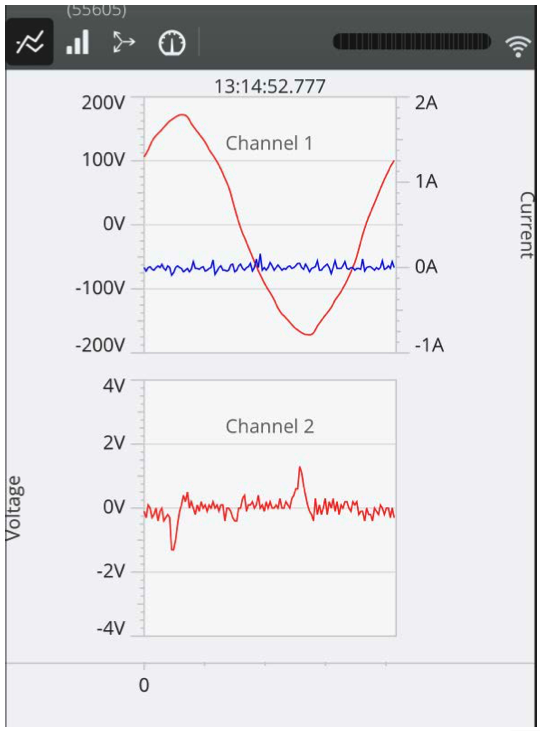
To access the live waveform feature, tap on the signal icon, located to the right of the device list. This action will reveal the channels associated with the live waveform. Alternatively, you can access it from the Quick Access View by going to Live Data > Waveform
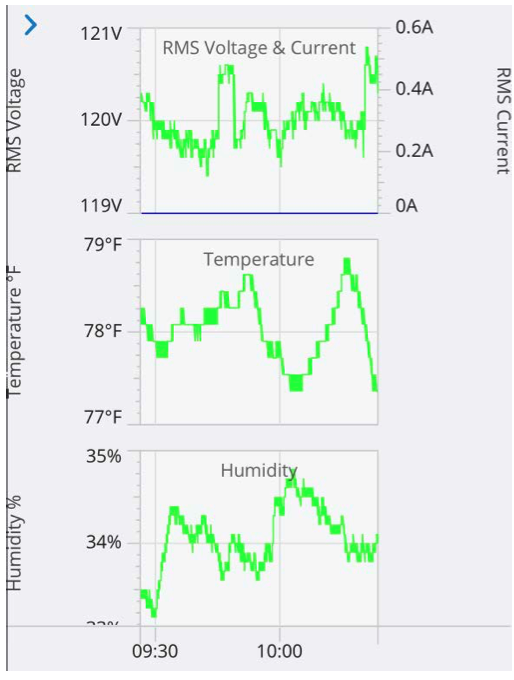
Stripcharts
To access stripcharts detailing environmental and power metrics, navigate to Overview within the Quick Access View.
Here, you’ll be presented with a default 8-hour view of RMS Voltage, Temperature, Humidity, and Pressure, with the flexibility to zoom into specific time intervals as needed. Having this level of detailed visualization at your fingertips on a mobile device ensures that you can stay informed and make data-driven decisions anytime, anywhere, enhancing the convenience and efficiency of power monitoring.
Conclusion
The Tensor, introduced by Power Monitors, epitomizes the next generation in power quality analysis. Designed for seamless integration with any standard 3-prong receptacle, it harnesses the capabilities of both cellular and WiFi communications, ensuring uninterrupted environmental and power data streaming. When paired with the iOS mobile integration of PQ Canvass, users gain real-time insights and historical data accessibility from any location.
