Abstract
PMI’s Revolution and Vision power quality recorders come equipped with Ethernet/networking capabilities which are easily configurable to allow quick connection and communication over a company’s network. This white paper will discuss the different configuration options that are available, in addition to some pros and cons of each.
Static vs Dynamic IP Addresses
The Revolution and the Vision are configurable to either receive a dynamic IP address from a DHCP server or to be directly configured to use a static IP address. The default behavior of both the Revolution and the Vision is to use the DHCP protocol to obtain an IP address. Using DHCP for IP address acquisition allows the user to essentially plug the device into the network without any further configuration. However, some organizations have strict regulations pertaining to network-connected devices. At this point, it may become necessary to configure the Revolution or Vision to use a static IP address (see Configuring for Static IP Addresses).
Static IP Addresses and ProVision
As mentioned before, network-connected devices are regulated differently at each institution, however, there are some general pros and cons to consider in locations where the user is given an option to deploy devices with statically or dynamically assigned IP addresses.
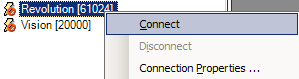
Using a static IP address allows a user to create a static entry into the Device Manager in ProVision one time and have the device visible on each subsequent use of the software. This is because the IP address does not change and the ProVision software will not have to send UDP broadcast packets (for more information on these packets, see: Dynamic IP Addresses) for discovery. Once the device has been added with a static IP address, all the user has to do in order to connect and communicate with the recorder is to Right-Click on the device and select an operation (Figure 1).
Many organizations have IT rules and regulations that stipulate that any and all hardware that is connected to a company network must be identified or identifiable. By using a statically assigned IP address, network and system administrators are able to catalog and identify every Revolution or Vision that is connected to the network in accordance with those rules (Figure 2).
Dynamic IP Addresses and ProVision
Dynamic IP address resolution of a Revolution or Vision through a DHCP (Dynamic Host Control Protocol) server can be tremendously useful for a user. This method of IP address resolution allows the user to simply connect the device to the network via ethernet and within a few seconds, the device will have obtained an IP address and will be discoverable in ProVision.
ProVision detects “dynamic” Revolution and Vision scanners by sending a UDP Broadcast Packet at a predetermined interval throughout the runtime of the software. This packet is a small UDP packet that is broadcast to the local subnet on the discovery port (default 7151, see: Communication Ports). Once the discovery packet has been sent, ProVision then goes into a waiting period (in the background) where it listens for UDP response packets being delivered back for identification. These response packets contain a minimal amount of identification information (IP address and Serial Number) that allows ProVision to dynamically add the discovered devices to the Device Manager. Once in the Device Manager, the user may right-click on the recorder and connect to it.
NOTE: Once a device is dynamically discovered by ProVision, the entry is saved in the Device Manager.
When a DHCP server assigns an IP address to a device, that IP address is only available for a specified lease time. Each DHCP server implementation and configuration are different and vary widely from organization to organization. A standard lease time, however, is usually about 24 hours. This means that if an ethernet-enabled PMI recorder is connected to the network and the user downloads a recording, then disconnects the recorder for a period of several days (or a period that exceeds the DHCP lease period), the recorder has “lost” its previous IP address. (In many cases reconnecting after the lease period will assign the same IP address, but this is not guaranteed.) This leads to a scenario where the cached connection in ProVision is “stale.” By default, when ProVision is launched it immediately tries to “ping (via UDP broadcast packet)” all of the pre-existing (cached) connections to make sure that they are still alive on the network. If they are not, then they are removed and will only become available after the next discovery cycle has begun (if the device is still connected to the network).
As mentioned earlier (see: Static IP Addresses and ProVision), many organizations’ IT departments have strict rules regarding the use of equipment connected to the network. DHCP-enabled Revolution or Vision scanners may violate these rules, so check with your IT department before plugging the device into the company network.
Configuring for Static IP Addresses
To configure a Vision or Revolution for a static IP address, follow the procedures listed below:
- Connect the recorder to the PC via the USB cable provided with the recorder.
NOTE: These settings can be changed over TCP/IP, but it is not recommended. Any misconfiguration of a network parameter through the network can render the device unreachable and would require the user to physically retrieve the device and reconfigure it via USB. PMI recommends making all network configuration changes via USB.
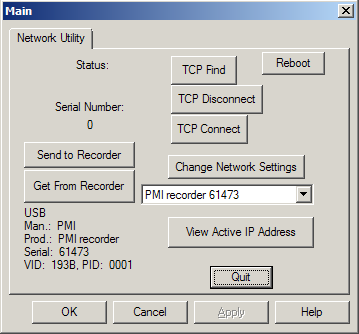
- Start the snet software. This software can be found in the user’s ProVision installation directory under the ws directory.
- From snet, the device should automatically connect and a connection status indicator should be visible in the lower left-hand corner of the window.
- Once the device has been connected, click on the Change Network Settings button, just above the drop down list.
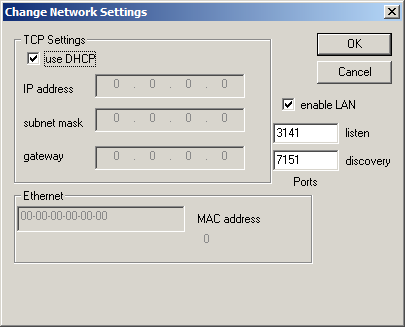
- From the network settings window, uncheck the use DHCP checkbox.
- Enter the device’s static IP address, subnet mask and default gateway as shown in Figure 3. The user may also use this window to retrieve the device’s MAC (Media Access Controller) address in the event that it is needed by network or system administrators.
- Click OK in the Change Network Settings window, and then click Apply from the main window.
Configuring for Dynamic IP Addresses
To configure a Vision or Revolution to use DHCP and obtain a dynamic IP address, follow the procedures listed below:
- Connect the recorder to the PC via the USB cable provided with the recorder.
NOTE: These settings can be changed over TCP/IP, but it is not recommended. Any misconfiguration of a network parameter through the network can render the device unreachable and would require the user to physically retrieve the device and reconfigure it via USB. PMI recommends making all network configuration changes via USB.
- Start the snet software. This software can be found in the user’s ProVision installation directory under the ws directory.
- From snet, the device should automatically connect and a connection status indicator should be visible in the lower left-hand corner of the window. Once the device has been connected, click on the Change Network Settings button, just above the drop down list. From the network settings window, check the use DHCP checkbox as shown in Figure 4.
- Click the OK button in the Change Network Settings window, and then click Apply from the main window.
Communication Ports
The Revolution and the Vision ship pre-configured with a default set of port values. Both devices use port 3141 for TCP communication and both devices use port 7151 for UDP broadcast communication (this is used for device discovery). Because ports 3141 and 7151 are non-standard and in the lower port range, organizations may wish to change these values to suit the needs of the IT and/or network security infrastructure.
Changing the communication and discovery ports on the ethernet enabled recorders is easy. It is recommended, however, that these adjustments/changes are performed uniformly (i.e. certain groups of recorders may be configured to broadcast on port 7152 to distinguish them from another group of recorders set to broadcast on port 7151). Having multiple recorders randomly configured to communicate on different ports would make it logistically difficult for multiple users on disparate machines to be able to effectively set up instances of ProVision to communicate with the devices.
NOTE: At the time of this writing, the ProVision software does not support discovery/communication with devices on the non-default ports. This is a feature that is scheduled to be released in a later version of ProVision.
To see how to configure the communication and discovery ports for the Vision and Revolution, see Configuring Discovery and Communication Ports.
Configuring Discovery and Communication Ports
To configure the port settings on a Vision or Revolution, follow the procedures listed below:
- Connect the recorder to the PC via the USB cable provided with the recorder.
NOTE: These settings can be changed over TCP/IP, but it is not recommended. Any misconfiguration of a network parameter through the network can render the device unreachable and would require the user to physically retrieve the device and reconfigure it via USB. PMI recommends making all network configuration changes via USB.
- Start the snet software. This software can be found in the user’s ProVision installation directory under the ws directory.
- From snet, the device should automatically connect and a connection status indicator should be visible in the lower left-hand corner of the window.
- Once the device has been connected, click on the Change Network Settings button, just above the drop down list.
- From the network settings window, enter a new port number into the listen or discovery text boxes.
- Click the OK button in the Change Network Settings window.