Introduction
Power Monitors’ PMI View is a cutting-edge iOS and iPadOS application for performing power quality analysis in the field, bringing the full capabilities of PMI’s advanced recording devices to your fingertips. This powerful mobile tool seamlessly connects to PMI recorders, providing real-time data visualization and comprehensive recording management, enabling engineers and technicians to make critical decisions on-site.
PMI View is designed to work seamlessly with a wide range of Power Monitors’ recording devices, including:
- Bolt
- Seeker
- Tensor
- Guardian
System Requirements
To ensure optimal performance, PMI View has been designed to work with recent iOS and iPadOS versions. The app requires:
- iOS Version: 16.4 or later for iPhones
- iPadOS Version: 16.4 or later for iPads
PMI View also supports both Light and Dark mode interfaces.
Key Features of PMI View
PMI View offers a robust set of features that transform mobile devices into powerful tools for power quality analysis.
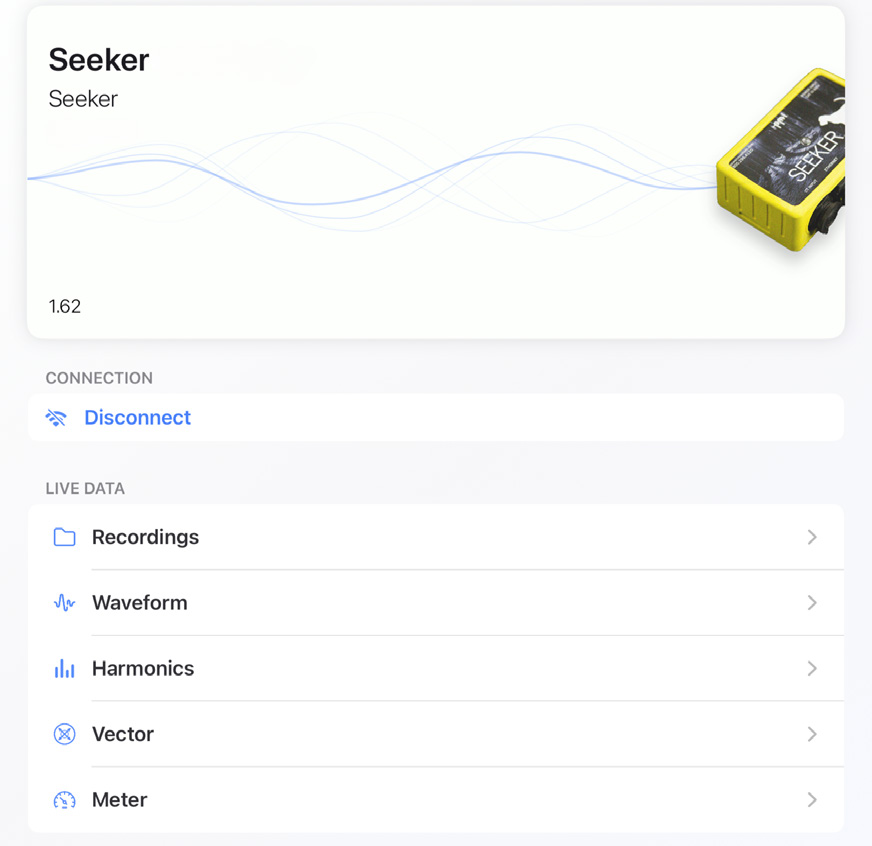
Live Data Viewing Capabilities
Users can view real-time waveforms, harmonics, vector diagrams, and meter readings directly on their mobile devices. This helps technicians ensure proper installation of recorders and allows for immediate diagnosis in the field.
Recording Management and Analysis
The app allows users to download and inspect recordings from PMI devices in the field, even in locations without internet connectivity. Users can perform initial analysis on-site, safely store the data for later inspection using ProVision, or upload to PQ Canvass once an internet connection is available. This helps bridge the gap between field data collection and in-depth office-based analysis.
Local and Remote Device Connectivity
PMI View supports various connection methods, including local Wi-Fi networks, cellular connections, and direct connection to a device’s access point. This enables engineers and technicians to access their devices in office environments, remote locations, or challenging field installations.
Getting Started
Installation Process
PMI View can be obtained from the Apple App Store at no cost. To download the application, open the App Store on your iOS device and enter “PMI View” in the search bar. Select the application from the search results and tap “Get” to install it on your device.
Main UI
Upon initial launch of PMI View, users are presented with two options:
- “Sign In”: Select this option if you have an existing PQ Canvass account. This allows access to cloud-based features and remote device management.
- “Connect To Device”: Choose this option if you do not have a PQ Canvass account or wish to connect directly to a local device.
The PMI View interface is organized into two main sections:
- PQ Canvass Integration:
- Devices (Remote Connection): Displays a list of devices synchronized from your PQ Canvass account.
- Direct Connection: Facilitates detection of nearby devices or manual connection to local devices.
- Recordings: Houses all recordings downloaded to the iOS device.
- Account: Provides access to PQ Canvass account information and settings.
- Field Operations:
- Devices: Enables detection of nearby devices or manual connection to local devices.
- Recordings: Stores and manages all recordings downloaded to the iOS device.
Connecting to a Device
PQ Canvass Device List
It is important to note that while PMI View integrates with PQ Canvass for device management, the actual connection is established by the device’s IP address. This means:
- For cellular-enabled devices, PMI View connects directly to the device using cellular networks.
- For Wi-Fi-enabled devices, both the iOS device running PMI View and the recorder must be on the same Wi-Fi network to establish a connection.
Direct Connection
To access a local device, PMI View offers several options. You can tap the dropdown menu on the right side to switch between several connection options.
Nearby Scanning
PMI View utilizes Bluetooth to detect nearby devices for connection to their access points. Devices will populate as they are detected.
- If the scanning screen is not visible, you may need to enable Bluetooth permissions in your device settings.
- Note: This requires a minimum firmware of 1.63
Manual
If you know a device’s serial number, you can connect manually. Simply enter the serial number and the device type, then tap connect.
- If the device is not visible in your Wi-Fi settings, connection through the app will not be possible.
Alternatively, if you know the IP address of the device, direct connection is possible by entering the IP address then tapping connect.
- Note: Ensure your iOS device and the recorder are on the same Wi-Fi network.
Recent Connections
The application maintains a list of recently connected devices for convenient access.
Connection Menu
Upon accessing the main menu, users can navigate to various sections such as live data and settings. At the top of the screen, a connect button is prominently displayed. PMI View initiates an automatic connection process to your device. If needed, users can reinitialize this process by tapping the connection button.
PMI View continuously monitors the connection status to a device and responds dynamically to any changes or loss of connection, ensuring a responsive user experience.
For access point connections, PMI View uses your phone’s Bluetooth capabilities to communicate and detect nearby devices.
- A prompt will appear requesting permission for PMI View to join a device’s access point.
- Tapping “Join” initiates this process.
- Note: During this transition, your iPhone will temporarily disconnect from the current Wi-Fi network before connecting to the device’s access point. This process may take a few seconds to complete.
Troubleshooting
If you encounter connection issues, follow these steps:
“Unable To Join”
- For access point connections, attempt a second connection if the first fails.
- If repeated attempts are unsuccessful, manually connect to the device’s Wi-Fi network through your iOS device settings.
- If you do not see your device in the wifi networks, ensure the device is on and in range.
- Once connected, return to PMI View, dismiss the device screen by tapping the left arrow in the top left-hand corner, and then reopen it to establish the connection.
General Connection Issues:
- Verify that the device is within range or on the same network as your iOS device.
- Ensure you are using the correct connection method for your device and setup.
- Dismiss and reopen the device menu to refresh the connection process.
- Verify that PMI View has the necessary permissions enabled on your iOS device.
If issues continue after trying the above steps, please contact our technical support team for further assistance.
Live Data Viewing
Waveform Display
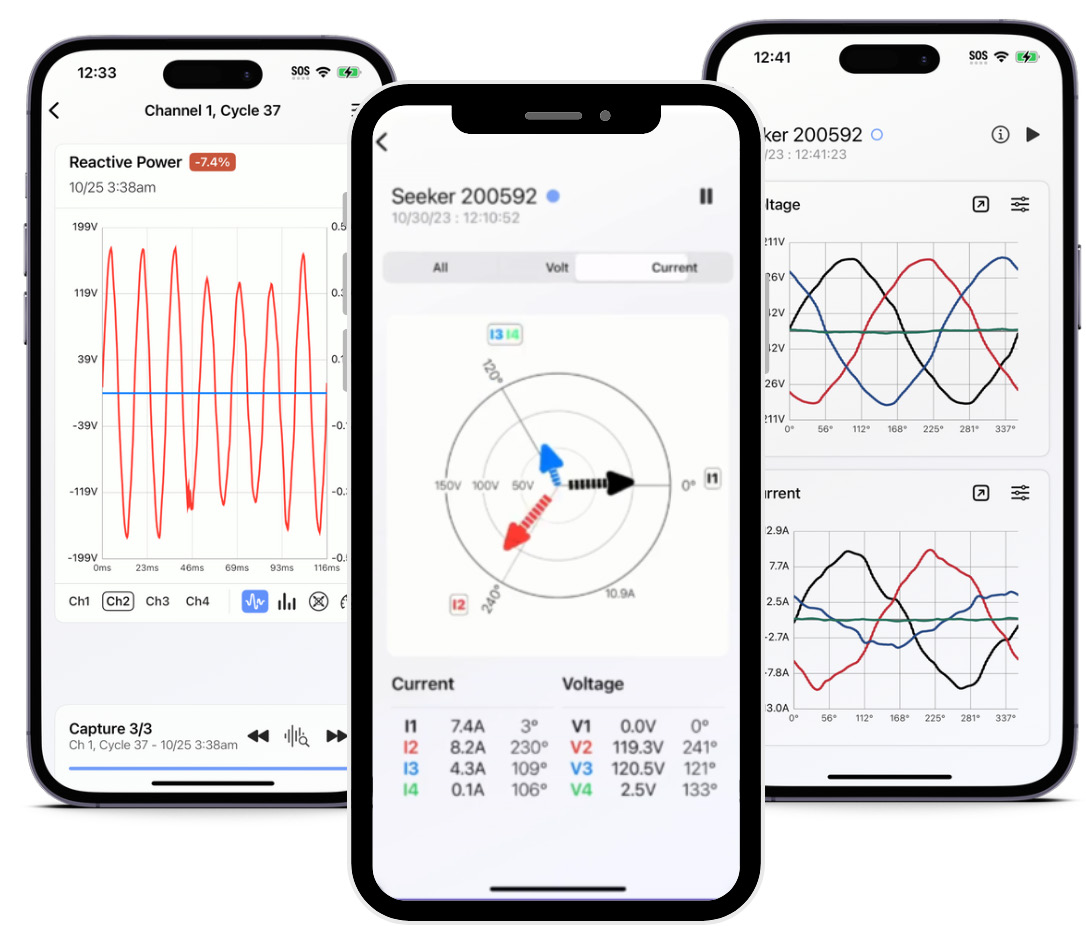
The Waveform Display feature provides real-time visualization of voltage and current waveforms. Users can interact with the display in several ways:
- Zoom Functionality: Pinch-to-zoom gestures enable both horizontal and vertical magnification, allowing for detailed examination of specific waveform segments.
- Playback Control: A pause/play button controls the continuous retrieval of waveform data.
- Channel Management: Tapping the controls enables or disables individual channels.
- Information Overlay: An ‘i’ button activates an overlay displaying a channel legend and real-time meter readings for RMS voltage, RMS current, and real power.
- Enhanced View: An arrow button expands the display to full screen.
Harmonics Display
The Harmonics Display offers a comprehensive view of harmonic content:
- Fundamental Harmonic Toggle: Users can include or exclude the fundamental frequency from the display. This can be found by tapping the control button for the settings menu.
- Harmonic Filtering: Options are available to filter and display only odd or even harmonics in the same settings menu.
- Horizontal Zoom: Users can pinch-to-zoom horizontally to focus on specific frequency ranges.
- Interactive Data Points: Tapping individual harmonic bars reveals detailed information including the harmonic number, channel, and magnitude.
- Real-time Updates: A pause/play button controls the continuous retrieval of harmonic data.
Vector Diagrams
Vector Diagrams provide visual representation of phase relationships:
- Selective Display: A control at the top of the screen allows users to display voltage vectors, current vectors, or both simultaneously.
- Visual Distinction: Voltage vectors are displayed as solid lines, while current vectors are represented by striped lines.
- Dynamic Updates: A pause/play button controls real-time updates of the diagram.
Real-Time Meter Readings
These readings can be used to see, in real time, what the device is currently reading or diagnostics information. This feature displays instantaneous values of key measurements, including:
- RMS Voltage
- RMS Current
- Real Power
- Apparent Power
- Power Factor
- Displacement Power Factor
For Tensors, environmental values such as temperature, humidity, and pressure are displayed at the top of the screen.
Harmonic Meter
The Harmonic Meter offers a numerical breakdown of harmonic components:
- Scrollable Interface: Both the Voltage and Current displays are scrollable.
- Real-time Updates: A pause/play button controls the continuous retrieval of harmonic data.
Settings
The Settings section allows you to control the device’s configuration:
- Secure Access Control: Entry requires a password or, if not set, the initialization code. If you do not have the initialization code (this shipped on a card with your device purchase), technical support can assist you.
- Network Management: Users can modify the Wi-Fi network connection and edit network settings.
- Security: The device password can be changed from this section.
- Tensor Relay: For Tensor devices, the relay can be turned on or off.
Device Recordings
The Device Recordings screen serves as a central hub for managing and accessing all recordings associated with a specific device. Access to this screen does not require a connection, though to download a new recording does require an active connection. This interface provides several key functionalities:
Recording List:
- Upon entering this screen, users are presented with a list of all recordings for the selected device.
- Each recording entry displays essential metadata such as the recording name, date, and duration.
- For data management, users can delete unnecessary recordings by swiping left on any recording entry to reveal a “Delete” option.
Recording Inspection:
- To view detailed information or analyze a specific recording, users can tap on any entry in the list.
- This action opens a detailed view of the selected recording, providing access to various analysis tools and graphs.
- Further whitepapers will explore PMI View’s comprehensive recording inspection capabilities.
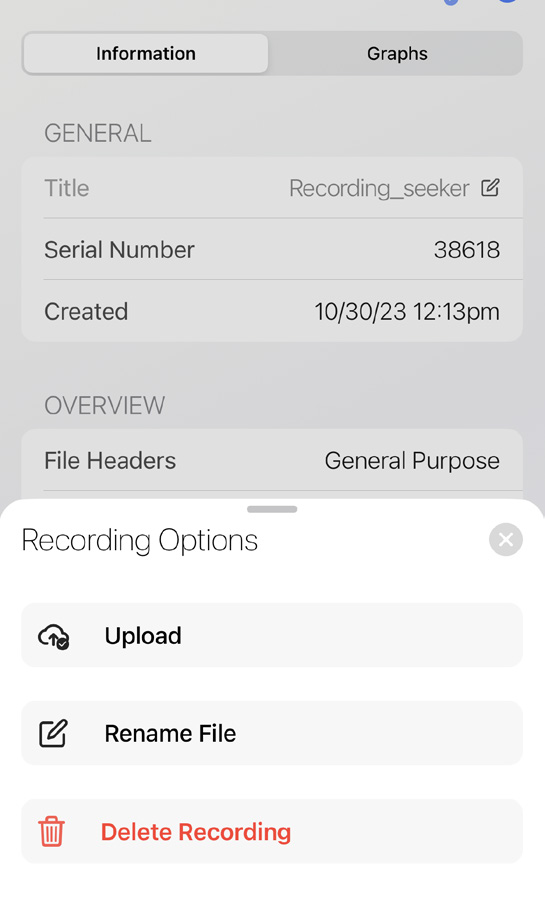
Recording Management:
- Inside the recording inspection, tapping the ellipses button provides options to rename or delete a recording.
- Quick renaming of the recording is possible by tapping the edit button next to the recording header’s title.
New Recording Acquisition:
- To download data from a recording session, users can tap the “Download A New Recording” button.
- This process allows users to retrieve the most recent data from the connected device.
- Note: If there is no active connection to a device, a popup will appear asking you to connect to a device first.
Device Initialization:
- Located in the top right corner of the screen, the “Initialize” button provides quick access to start a new recording session with custom parameters.
- Tapping this button navigates to the Initialization screen, where users can configure the device for a new recording.
- If you do not have an active connection, this button will be grayed out.
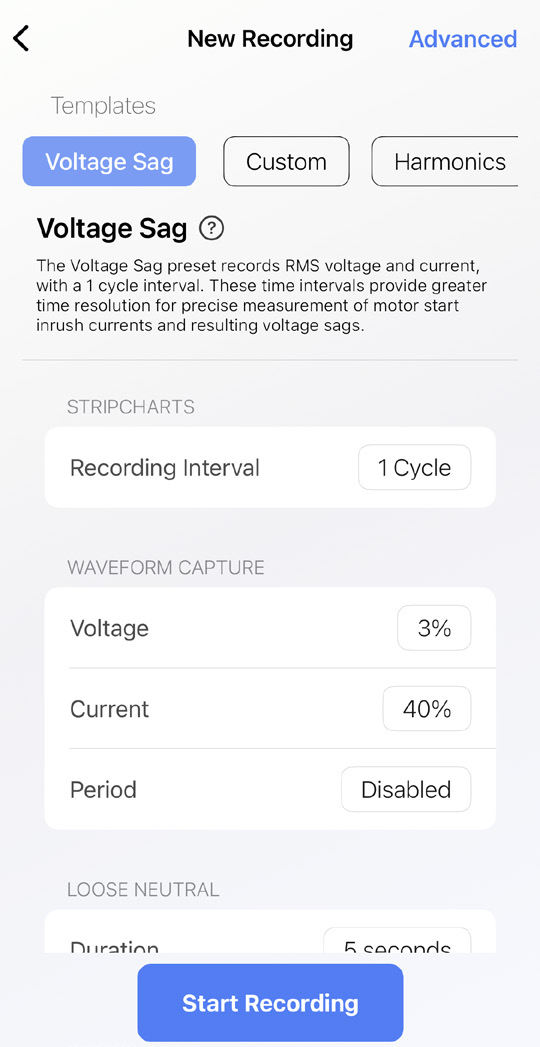
Initialization
Device recordings provide a multitude of features and power quality information, and with recent additions, initializing a new recording is now easier and more intuitive than ever.
- Template Selection: Users can choose from pre-made templates or create and save custom configurations.
- Extensive Options: Detailed control over recording parameters, along with helpful definitions and guides.
Managing Recordings
The Recordings tab serves as a centralized recording management hub. This shows you all the recordings stored on your iOS device.
- Efficient Searching: The search bar at the top allows users to find any recording quickly.
- Export Functionality: Options to export recordings to PQ Canvass, OneDrive, or via wireless transfer.
- For efficient data management, users can delete unnecessary recordings by swiping left on any recording entry to reveal a “Delete” option.
Recordings can be exported in multiple ways. Tapping the cloud menu on the top right will reveal several options.
- If you have already uploaded your recording to PQ Canvass, a check-mark will appear in the cloud icon. You can still reupload it to PQ Canvass if desired.
- PQ Canvass: Recordings uploaded to PQ Canvass will be found under the ‘Provision Sync’ folder.
- One Drive: PMI View interfaces with Microsoft’s OneDrive platform, allowing you to upload your recording to your desired folder.
- Wireless Transfer: The Wireless Transfer allows users to easily export their NSF file with any PC.
- Simply tap the Wireless Transfer button. An IP address will appear on your device. From your PC, simply go to any internet browser from your PC and type in the IP.
- You will find a comprehensive list of all your NSF recordings. Simply click on your desired recording to download it.
- Note: This requires the iPhone/iPad and your PC to be connected to the same wifi network.
- iTunes: NSF Recordings can also be found by opening our iPhone/iPad with iTunes.
Conclusion
In conclusion, PMI View exemplifies the transformative potential of mobile applications in power quality analysis. By leveraging the power of iOS devices, PMI View empowers professionals to conduct sophisticated power quality assessments with unprecedented ease and efficiency.
Downloads
PMI View can be downloaded by visiting: https://powermonitors.com/product/pmi-view/
