Abstract
Canvass is a feature-rich data analysis web application and database developed by Power Monitors, Inc. to provide a complete RMS voltage picture to users via any device equipped with an internet browser. This white paper focuses on one of its many features – setting up e-mail distribution lists for alert and event notifications.
Events and Alarms
The Canvass e-mail distribution system revolves around a number of components. Two of these critical components are Events and Alarms.
An Event is an occurrence which is just what it sounds like – a single event that, when it occurs, generates a data transmission to the Canvass servers which in turn generates an e-mail for all those who have been registered to receive an e-mail for said event. Events do not necessarily span an amount of time – each event will trigger an update packet to Canvass and, if there are any registered e-mail recipients, they will be notified. Listed in Table 1 are all of the available events and what they mean.
An Alarm is a state that a device may be in. These states may span long periods of time (hours or even days) or may be as brief as just a second or two. Users who have created distribution lists to receive Alarm e-mails will be notified when the device enters an alarm state and when it exits an alarm state. This method of notification was selected to prevent multiple e-mails from being sent for a device that remains in an alarm state for a prolonged period. The exception to this rule is the “no alarm” series of alarms – these are all similar to events in that they are only triggered once, when a device falls out of its respective alarm state (voltage, current, frequency, etc). Listed in Table 2 are the various alarms that are configurable through Canvass for Boomerangs.
| Event | Description |
|---|---|
| Power On | This event is fired every time that a Boomerang is powered on and connects to the cellular network. |
| Auto Shutdown | This is triggered when a Boomerang has entered into a state where the device needs to shutdown. (An example would be during a power outage when the device’s ride-through battery is running low.) |
| Manual Shutdown | This event is triggered when a device is manually powered down. |
| No NTP Time | This event is triggered when a Boomerang cannot connect and retrieve an NTP (Network Time Protocol) update from an NTP server. |
| New Firmware Download | This event is sent after firmware has been uploaded to a Boomerang, the checksum has been verified and the firmware is to be installed in the device. |
| New Settings Download | When new settings are sent to a Boomerang from either Canvass or the Network Management Software, the user is alerted by e-mail that the settings have been sent. |
| Alarm Status Change | Used to indicate a change in the device’s alarm state (see below). If this event is not configured in an e-mail distribution list then any alarm state changes will not be sent via e-mail. |
| Alarm State | Description |
|---|---|
| Voltage No Alarm | This alarm state is triggered when a voltage alarm state goes from “in alarm” to “no longer in alarm.” |
| Voltage Low Low | This alarm state is entered when a Boomerang measures a voltage value that is at or below a user-defined LOW LOW threshold. |
| Voltage Low | This alarm state is entered when a Boomerang measures a voltage value that is at or below a user-defined LOW threshold, but above a LOW LOW threshold. |
| Voltage High | This alarm state is entered when a Boomerang measures a voltage value that is at or above a user-defined HIGH threshold, but below a HIGH HIGH threshold. |
| Voltage High High | This alarm state is entered when a Boomerang measures a voltage value that is at or above a user-defined HIGH HIGH threshold. |
| Network Usage | This alarm state is triggered when an excessive amount of bandwidth has been consumed by a Boomerang. This alarm is intended to prevent excessive “overage” charges from a wireless provider for a specific device. |
Distribution Lists
The distribution lists in Canvass are “all-inclusive.” This means that every user will receive an e-mail for every event and alarm that has been selected for all selected recorders. As an example, if an administrator adds four users to a distribution list, then selects six recorders, all alarms and all events, then this means that any time that any one of the recorders enters into an alarm state, exits an alarm state, or triggers an event, then all users in the distribution list will receive an e-mail alerting them to this scenario.
If a user wishes to assign a specific event or alarm for a specific recorder to an individual/specific user, then a new distribution list will need to be created for each such scenario. The rule to remember is that all users in a distribution list will be notified of any alarm or event triggered by any recorder in the list.
Other possible scenarios for creating distribution lists include: creating a list for one specific event or alarm for all recorders to go to a specific group of users; and creating a list of recorders in a specific area of responsibility that will send e-mails to a specific user or group of users.
There is no limit to the number of distribution lists that can be created for a user. Other rules to consider:
- A user may belong to more than one distribution list.
- A recorder may belong to more than one distribution list.
Keep in mind that if users and recorders are added to multiple distribution lists with the same events and alarms set to trigger, then that user may receive multiple e-mails for the same event or alert.
Creating and Maintaining E-Mail Distribution Lists in Canvass
Only account administrators can create, view or modify e-mail distribution lists.
Distribution lists are comprised of several elements, as mentioned above. Two of these components, alarms and events, have already been discussed. The remaining components are the user accounts and the devices (Boomerangs) list.
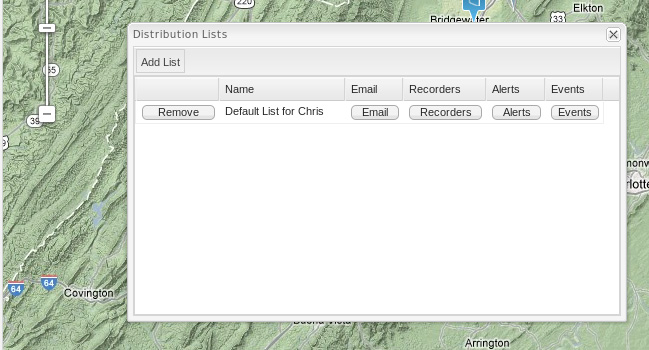
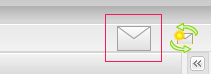
To begin, log into Canvass, and then select the Administration menu at the top, and then select “E-mail Alert” as shown in Figure 1. This will bring up the “Distribution Lists” management dialog as shown in Figure 2. This dialog will show any distribution lists that have already been created. It is from this dialog that existing distribution lists are edited and new distribution lists created.

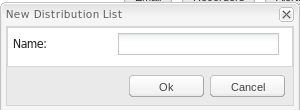
To create a new distribution list, click on the “Add List” button at the top-left of the Distribution Lists window. This will launch the “New Distribution List” dialog. See Figure 3. Give the new distribution list a name and click “OK” to save it. For the purposes of this white paper, my distribution list will be named “Example List.”
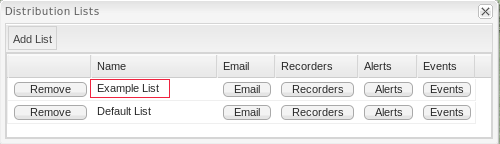
After the new list has been created, it should show up in the Distribution Lists window with a series of buttons surrounding it (Figure 4). These buttons are “Remove” (to the left of the list) and then: “E-mail”, “Recorders”, “Alerts” and “Events”. Each of these buttons serves a somewhat self-explanatory purpose.
The “Remove” button does just what it says it will do – it removes the distribution list from the user’s account. The “Remove” operation cannot be undone.
The “E-mail” button allows the user to select all of the users in the account that are to be notified of events and alarms for the distribution list as shown in Figure 5. To add a user to the distribution list, simply check the box next to their name. If all Canvass users are to be added to the distribution list for the current account, the “Select All” button at the top can be used to select all members. The “Deselect All” button deselects all users in the e-mail distribution list window.
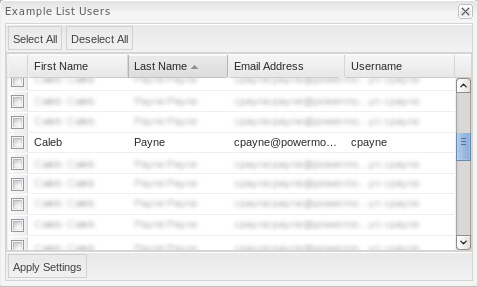
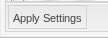
The selected users are not “saved” to the list until the “Apply Settings” button (at the bottom left-hand corner of the screen) is selected (Figure 6).
Once the users for the distribution list have been defined and selected, the list of devices that will be monitored through e-mail should be chosen. This can be done by selecting the “Recorders” button next to the distribution list name in the “Distribution Lists” window. Clicking this button opens the “Recorders” window as shown in Figure 7.
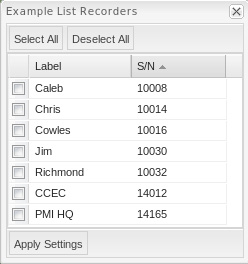
Just as with the e-mail address list, the recorders list is a list of all recorders assigned to a user’s account. Select any recorders that should be added to the distribution list for e-mail notifications. As with the users list, there is a “Select All” button and a “Deselect All” button at the top-left of the window. These buttons will either place a check next to all of the available recorders (select all) or remove the check from all of the available recorders (deselect all). In order to save the selection, the “Apply Settings” button at the bottom of the window must be clicked.
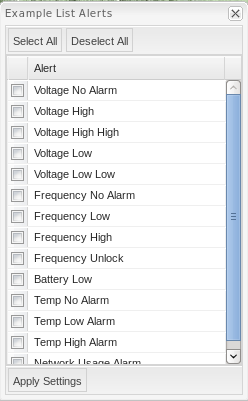
Next, the user must select which alarms and events should trigger e-mails to the selected users for the selected recorders. To do this, click on the “Alerts” button to edit the list of alarms or the “Events” button to edit the list of events (Figures 8 and 9). For a description of each of these alarms and events, see above. The alerts and events windows are identical to the users and devices windows. Simply place a check next to the alarms and events that should be added to the distribution list and then select “Apply Settings” to save them. The “Select All” and “Deselect All” buttons work as mentioned above.
Setting Thresholds for Alarms and Events
The voltage alarms mentioned above are triggered when certain thresholds are met (or exceeded). Setting these thresholds is a fairly straight-forward task. For this whitepaper, the thresholds on Boomerang 10014 will be loaded and modified.
As with configuring distribution lists, a user has to be an account administrator in order to modify a device’s settings.
Start by clicking on the “Administration” menu at the top of the screen (Figure 1). Now select “Configure Devices.” This will bring up the Device Settings window (Figure 10). This window will present a list of all of the Boomerangs included in the user’s account. Find the device whose thresholds are to be adjusted and click the “Edit” button next to the device’s label.
When this button is clicked, it may take a few moments before the user interface responds. What is happening is that the Canvass application is connecting to the Boomerang and retrieving the full list of settings from the device so that the form can be populated (Figure 10). Once the settings have been retrieved the user interface “unlocks” and is editable.
From this window, click on the “Voltage Threshold Settings” tab at the top of the window. The thresholds window is shown in Figure 10. This tab will expose the following settings:
- Voltage Low Low Threshold
- Voltage Low Threshold
- Voltage High Threshold
- Voltage High High Threshold
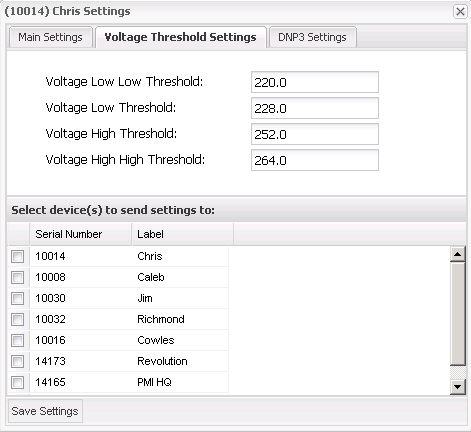
Adjust these thresholds to the desired levels and then click “Save Settings” at the bottom of the window. This will package the new settings up and send them to the device. It may take a few seconds for the process to complete. Once the device has successfully received the settings, it will send an acknowledgment to Canvass and the user will receive a Canvass message (alerts are in the top, right-hand portion of the screen as shown in Figure 11).
Once a response has been returned from the Boomerang, the new thresholds are in place and the distribution list users should start receiving e-mails generated from meeting or exceeding these new settings.
Conclusion
The Canvass e-mail alert system is a robust and powerful tool. This system provides power quality professionals the ability to get real-time, on-the-spot notifications from recorders and sensors in the field through their e-mail (on a desktop, on a laptop or any mobile device), 24 hours a day, 7 days a week, all through a simple and intuitive online configuration.
