Abstract
This whitepaper covers the proper method used to disconnect power quality recorders and remove them safely from their location. Following the proper disconnection sequence eliminates or minimizes generating and recording false events as the leads are disconnected. Also, the proper disconnection process prevents the recorder from running on the ride-thru battery after it’s removed from the circuit. The ideal disconnection process is described below for PMI recorders with and without a display, and with and without local communications.
Disconnect Sequence: Recorder with a Display
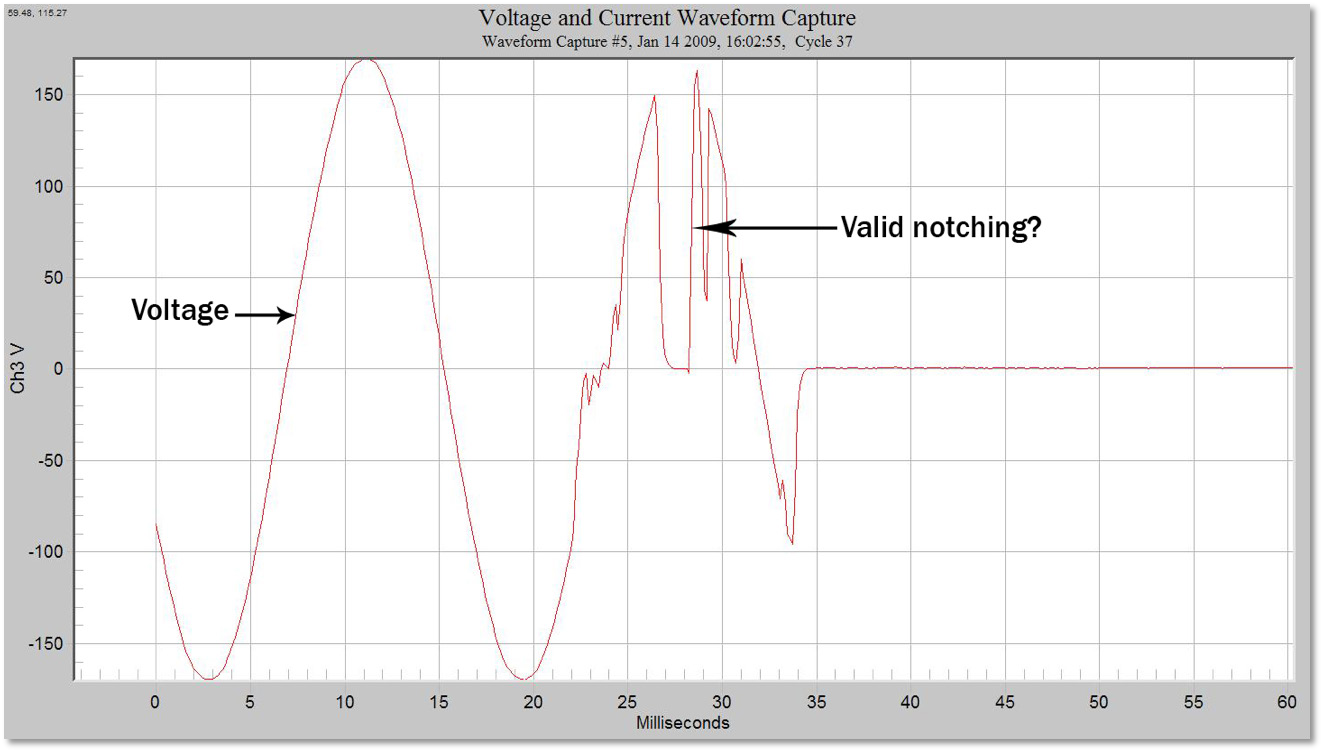
The best method to disconnect a recorder is to first stop the device from recording data prior to disconnecting it from the electrical circuit. Most PMI recorders have some sort of alternate power supply, i.e. a battery. This will allow the PQ meter to continue recording when deprived of AC power. If the recorder continues to function while you are attempting to remove it from the circuit, you can get a variety of false events. The unit will continue recording on the internal ride-through battery and false events may be triggered during disconnection of the voltage leads and current CTs, as shown in Figure 1.
If Recorder Has Display/Keypad
Some of the PQ recorders built by Power Monitors Inc. have a visual display with a keypad on the front. These are the ViP, 600P and SVM box recorders. To stop the recording process on these units, press the solid blue button on the front panel and the main menu will appear as shown in Figure 2.
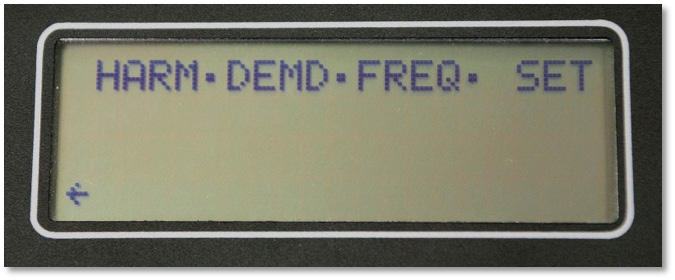
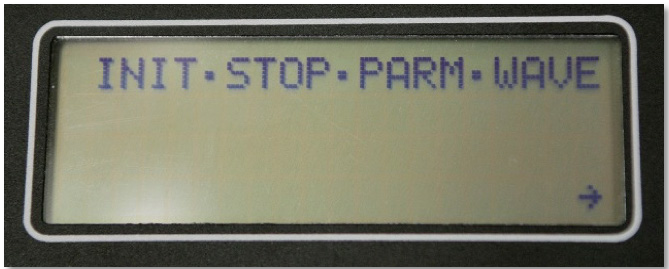
The last item in this menu will be “SET”. Press the right arrow (shown in Figure 3) to highlight “SET” and press the blue “SET” button. Once selected, a second menu will appear. Arrow over to the second item labeled “STOP” and select it by pressing the blue “SET” button. This will shut down the recording process so the unit can be disconnected.
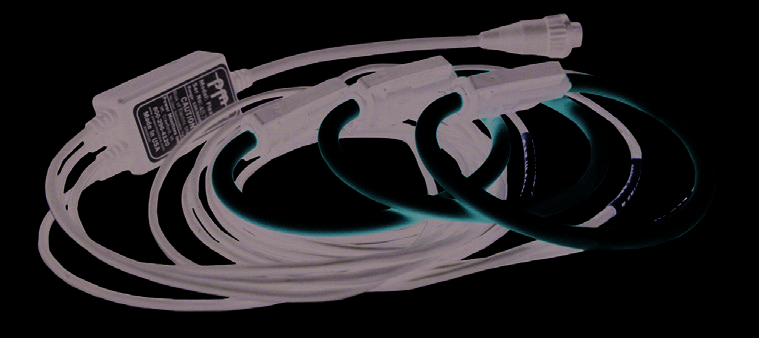
Once the unit is no longer recording, you may proceed to disconnect first the Flex CTs (If in use) and then the Voltage leads (Figure 4). The first Voltage lead to be disconnected should be the Common leads. Please keep in mind that box recorders have 4 independent channels, each with its own separate ground. The other leads may then be disconnected. The recorder will power itself off after the channel 1 voltage lead is removed, rather than continuing to run on the internal ride-thru battery.
Please remember that dangerous voltage levels may still be present in the cabinet or in close proximity to the recorder. Follow all company safety procedures and wear proper Personal Protective equipment.
Disconnect Sequence: Units Without a Built-In Display
If the PQ unit being removed does not have an onboard display, a laptop may be used to stop recording.
Eagle, Guardian and Revolution model PQ recorders are all capable of communicating with a laptop via USB or wireless connection. The laptop will need to be running ProVision. Use the following steps:
- Connect the unit to the laptop via Bluetooth, cell connection, or with the correct USB cable.
- Start ProVision.
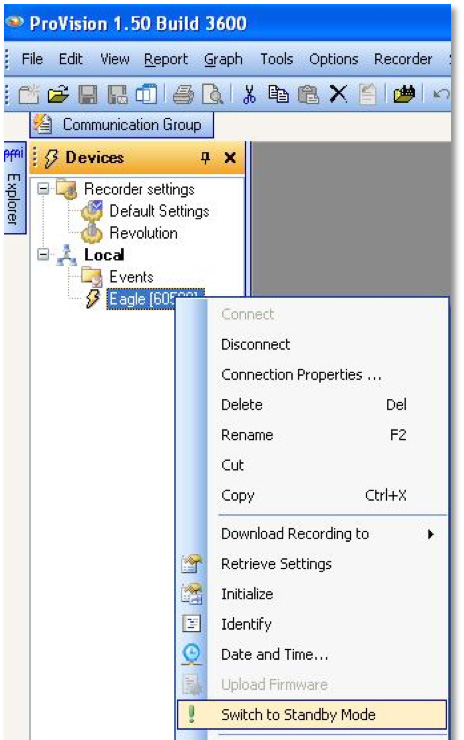
- Under the “Devices” list, right click with your mouse on the serial number of the unit you wish to stop recording, as shown in Figure 5.
- Scroll down and select the “Switch to Standby Mode” option.
- Once this is done, you should note that the small, yellow lightning bolt next to the unit serial number has turned red.
- At this point, you can either download and reinitialize the recorder if you want to leave it in place, or:
- You can disconnect from the unit and remove it from the circuit.
Keep in mind that many recorders have multiple ways of communicating. Most Eagles and Revolutions as well as all Guardians can also communicate through Bluetooth. The standard 2SX socket units can communicate through the PMI USB adapter.
Once the unit is no longer recording, you may proceed to disconnect first the Flex CTs (If in use) and then the Voltage leads. The first Voltage lead to be disconnected should be the Common lead. The other leads may then be disconnected.
Disconnect Sequence: Alternate Method
Occasionally, you may be required to disconnect a recorder that has no display/keypad, and no means of communication is possible.
- Disconnect any CTs that may be connected to the PQ recorder. The recorder senses the CT removal, and uses this to determine that the upcoming power removal is a removal from service, not a utility outage. The unit will disable the ride-through battery and prevent further recordings when the voltage is removed from the main supply.
- Remove the Voltage leads – disconnect COM first, then CH1, CH2, CH3, CH4. If CH2, CH3 or CH4 voltage leads are removed prior to the Common lead, you can still record anomalies since CH1 and COM will maintain power to the recorder.
For a meter socket recorder, there are no CTs – simply pull the revenue meter, then the recorder from the meter base. Built-in detection circuitry in the socket recorder senses the removal from the meter base and stops the ride-through battery.
If a recorder is later energized with AC power, it will resume recording, appending data to the existing recording. If a recorder is powered up in the office with a USB cable or wall adapter, it will simply wait for a connection from ProVision, with no additions to the existing recording.
Conclusion
Removing a PQ recorder from service while it’s recording could result in unnecessary waveform captures or other events that mark the physical removal of voltage leads. Ending the recording before removal provides a clean end to the data session. Following the correct procedure also prevents a PQ recorder from needlessly running on the ride-thru battery. If possible, end the recording via the front panel or through a wireless connection with ProVision. Then unplug the CTs from the recorder. Finally, disconnect the voltage leads from the recorder, starting with the white (common) lead, then channels 4, 3, 2, and 1. Please remember that dangerous voltage levels may still be present in the cabinet or in close proximity to the recorder. Follow all company safety procedures and wear proper Personal Protective equipment when working with hazardous live voltage.
