Abstract
The majority of commercially-available end-user software products incorporate a graphical user interface (or GUI) that allows the user to interact with the program. Some of these products have static, immutable interfaces while others offer high degrees of customization, often even allowing the possibility of the end-user to change the configuration settings to such an extent that a customized version of the interface bears little resemblance to the original. Since the uses of any software product is dependant upon the end-user, it makes more sense to create an interface with basic functionality and allow the end-user to tailor the interface to their liking based on the frequency of use of the commands.
ProVision, when initially installed, offers a standard complement of toolbars and menu entries offering basic, multi-purpose functionality. However, ProVision allows these toolbars and menu entries to be rearranged, relocated, and remapped. In ProVision, commands can be added, removed, and mapped to keyboard shortcuts. This white paper demonstrates how to customize the ProVision user interface.
Toolbar Options
To create a new toolbar in ProVision, right-click the menu bar or any toolbar. From the context menu that appears, select the option for “Customize”. This launches the Customize dialogue, as shown in Figure 1, populated with all current available toolbars. Removing the checkbox from any of these will cause that toolbar to no longer be displayed in the ProVision user interface.
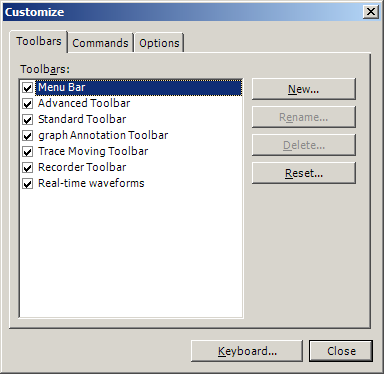
To create a new Toolbar, select the “New” button. In the dialogue that appears, enter a name for the new toolbar and select its initial location from the drop-down box. Both the name and toolbar can be modified later as needed. The new toolbar is immediately placed in the ProVision interface in the specified location. Selecting any of the Dock options means the toolbar will appear on the specified side of the main ProVision window, while choosing Floating means the toolbar will appear in its own window. The default selection for toolbars is to dock them at the top of the main ProVision window with the other toolbars.
Custom toolbars can be renamed and deleted using the Rename and Delete buttons, respectively, in the Customize dialogue. Note that these can only be applied to user-created toolbars—it is not possible to delete or rename any default toolbar included with ProVision, and thus these options are grayed out and not available when a default toolbar is selected.
Customizing Toolbar Commands
Select the “Commands” tab in the Customize dialogue, as shown in Figure 2. This shows a list of commands available in ProVision, categorized by their effect. Selecting a category from the pane on the left will cause the pane on the right to populate with all available commands in that category. From here, commands can be added to any toolbar by selecting the command to be added, and, keeping the mouse button held down, dragging the command to its desired location on the toolbar, then releasing the mouse button. Furthermore, existing commands can be moved from one toolbar to another similarly, or removed entirely by dragging them outside of the ProVision window before releasing the mouse button. Whenever a command is added to or removed from a toolbar, the toolbar is automatically resized in order to accommodate this change.
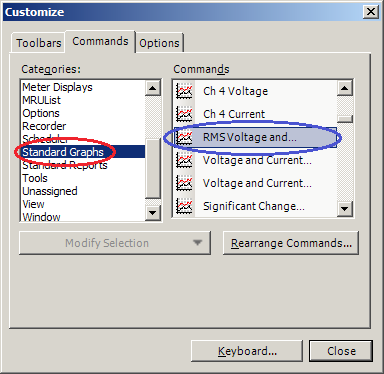
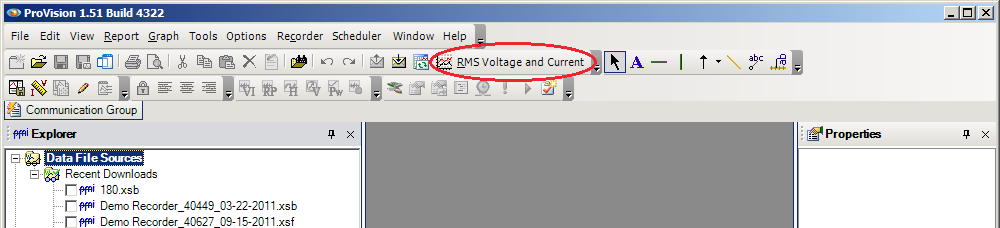
For example, to add a shortcut to the graph “RMS Voltage and Current” for the currently selected recording files, first open the Customize dialogue and select the “Commands” tab, as shown in the graphic. In the left-hand pane for Categories, scroll down and choose Standard Graphs, shown in red. This populates the right-hand pane of Commands with all the standard graph types available. In the right-hand pane, scroll until “RMS Voltage and Current” is visible, as shown in blue. Click and drag “RMS Voltage and Current” to any of the existing toolbars in ProVision and release it in the location desired to place the shortcut. This makes accessing this particular graph available directly through the toolbar. The screenshot below shows the ProVision interface with the new command in place, shown in red. Note that the text to describe the graph is still displayed—this is because the command invoked is for a graph, specifically the “RMS Voltage and Current” graph.
Each toolbar also has several options built in, as shown in the displayed Recorder toolbar. The area circled in red is the toolbar’s handle—the toolbar can be repositioned by clicking the handle and dragging the toolbar to its desired location. This allows the toolbar to be docked to any other side of the ProVision main window by simply dragging it there. Note that toolbars docked on the top and bottom of the window will be aligned horizontally, while the toolbars docked on the left and right side will be aligned vertically. Note that checking “Lock the Toolbars” from the toolbar context menu removes the handle and prevents the toolbars from being moved. This feature can be useful to prevent accidentally relocating toolbars from errant mouse movements.
The toolbar options menu, shown in blue, allows individual commands on the toolbar to be shown or hidden without actually removing them from the toolbar. This is analogous to the checkbox list for each toolbar in the Customize dialogue, but only for each command on the toolbar. There is also access to the Customize dialogue through this menu, and an option to reset the toolbar. The Reset option restores the toolbar to its original configuration prior to customization. Note that performing a reset on a custom toolbar will cause all commands placed on it to be removed.
Creating Keyboard Shortcuts
It’s also possible to map a keystroke, or a combination of keystrokes, to automatically invoke a specific command, even if that command is not currently visible on the menu or any of the toolbars. From the Customize dialogue, select the “Keyboard” option at the bottom. From the new window that is shown, choose a Category, then select any of the Commands available in that category, as shown in Figure 4. The drop-down box for “Specify a Shortcut” contains a list of all valid key combinations that can be assigned to the currently-selected command. (Note the “+” sign indicates the listed keys are to be held down simultaneously, not that the actual plus key is part of the combination.) Any keystroke combination that is currently unassigned can be used.
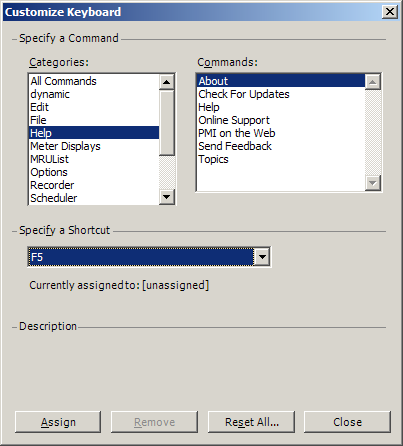
Finally, after selecting the category, the command from that category, and the keystroke combination to bind that command to, choose Assign. This can be done any number of times to map any number of commands to any number of available keyboard shortcuts. Note that keyboard shortcut combinations must be unique: it is not possible to bind multiple commands to one combination; commands to combinations can only be done on a one-to-one basis.
To unbind a command from a keyboard shortcut, select the original category and command, then select Remove. This causes the previously-bound keystroke combination to no longer invoke the specified command. The keystroke combination can then be used to bind to another command, or the command can be bound to a different keystroke combination. Also available is the “Reset All” option. This removes the bindings of all keystroke combinations from their respective commands. Ensure this is the desired operation prior to executing it though, as the keystroke bindings cannot be restored short of manually reassigning each to their original corresponding commands.
Customization settings are preserved by ProVision as part of its shutdown routine, so they persist the next time ProVision is reopened. However, if customizations are made to ProVision and ProVision does not close properly, due to improper system shutdown or ProVision being forcefully closed, the customizations made during that session will be lost. It is important to keep this in mind to prevent loss of work.
Being able to customize the ProVision user interface according to one’s specifications and desires can greatly expedite a user’s ability to navigate to and access commands they would more commonly use, and thus increase their throughput accordingly. While the default layout for the ProVision user interface does contain basic, multi-purpose functionality, knowing how to add specific commands and functionality can be vital for easing the use of an often-used task that isn’t initially readily available.
